How to Photograph the Northern Lights: Complete Guide to Settings, Gear & Locations
How to Photograph the Northern Lights: The Complete Guide
When I was a young boy growing up in Alaska, those dancing northern lights captivated me and became an unforgettable part of my childhood. As I grew older and my interest in photography deepened, I wanted to learn how to photograph the northern lights to capture that magical experience and share it with others. This passion ultimately led me to lead photo tours and photography workshops, helping others capture and live out the dream of being under the northern lights—just as I did when I was a kid growing up in Alaska.
This ultimate guide is everything I wish someone had shared with me when I first started photographing the northern lights. In it, we’ll cover the gear that actually matters, the camera settings that work in the field, and the planning tricks that separate photographers who come home with beautiful pictures from those who come home with blurry green smears and frostbitten fingers.
Let’s get you ready to photograph the northern lights. Whether you want to learn how to take northern light photos with a professional camera or your iPhone, this guide covers both.
To photograph the northern lights, set your camera to manual mode, shoot RAW, and start with these settings: aperture f/2 to f/2.8, ISO 1600 to 3200, shutter speed 3 to 8 seconds, focus manually on a bright star using live view at 10x zoom. Use a fast wide-angle lens (14 to 24mm) on a sturdy tripod, focus before darkness when possible, and adjust shutter speed shorter for fast-moving aurora and longer for faint displays. Watch your histogram between shots, not the LCD preview — the camera always shows the aurora brighter than it is.
Answering Your Biggest Questions First
Before we dive deep, let me give you the quick answers you probably came here for. For further explanation make sure to read through this post as we cover a lot of information from camera's to iPhones.
What gear do I need? A DSLR (crop sensor camera) or mirrorless camera with manual mode controls, a fast wide angle lens (14–24mm at f/1.4–f/2.8), and a sturdy tripod that won'’t wobble in Arctic wind. That'’s the core kit. Manual settings are essential for adjusting exposure parameters like shutter speed, ISO, and aperture to get the best results in low light. A digital camera with manual controls is essential for aurora photography, as it allows you to fine-tune your settings for the best photos of the northern lights.
What iPhone settings work: Maximize the exposure time. In Night Mode, you can adjust the exposure duration. Slide it to maximum—often 10-30 seconds when the phone detects its stable on a tripod. Bring a power bank to keep your phone charged during cold nights, as batteries drain quickly in low temperatures.
What settings should I start with? Set your camera to manual mode, shoot RAW, and try this starting recipe: ISO 1600–3200, aperture f/2–f/2.8 (this f stop lets in more light, which is crucial for northern lights photography), shutter speed 2–10 seconds depending on how fast the aurora is moving. Adjust from there based on what you see on your screen. These settings help you achieve good photos of the northern lights by balancing exposure and clarity.
When and where should I go? The best months run roughly September through March in the Northern Hemisphere. Peak viewing hours typically fall between 10:00pm and 2:00am local time. Classic aurora destinations include:
- Fairbanks, Alaska
- Tromsø and Lofoten in northern Norway
- Abisko in Swedish Lapland
- Finnish Lapland around Rovaniemi and Saariselkä
- Yellowknife and Whitehorse in Canada
These locations offer dark skies, minimal light pollution, and statistically high aurora activity during the season.
If you’d rather shortcut the learning curve and shoot alongside someone who’s been doing this for years, my small-group northern lights photography workshops are designed exactly for that—hands-on learning under the actual aurora, including how to capture photos of the northern lights.
Understanding the Aurora: What You’re Actually Photographing
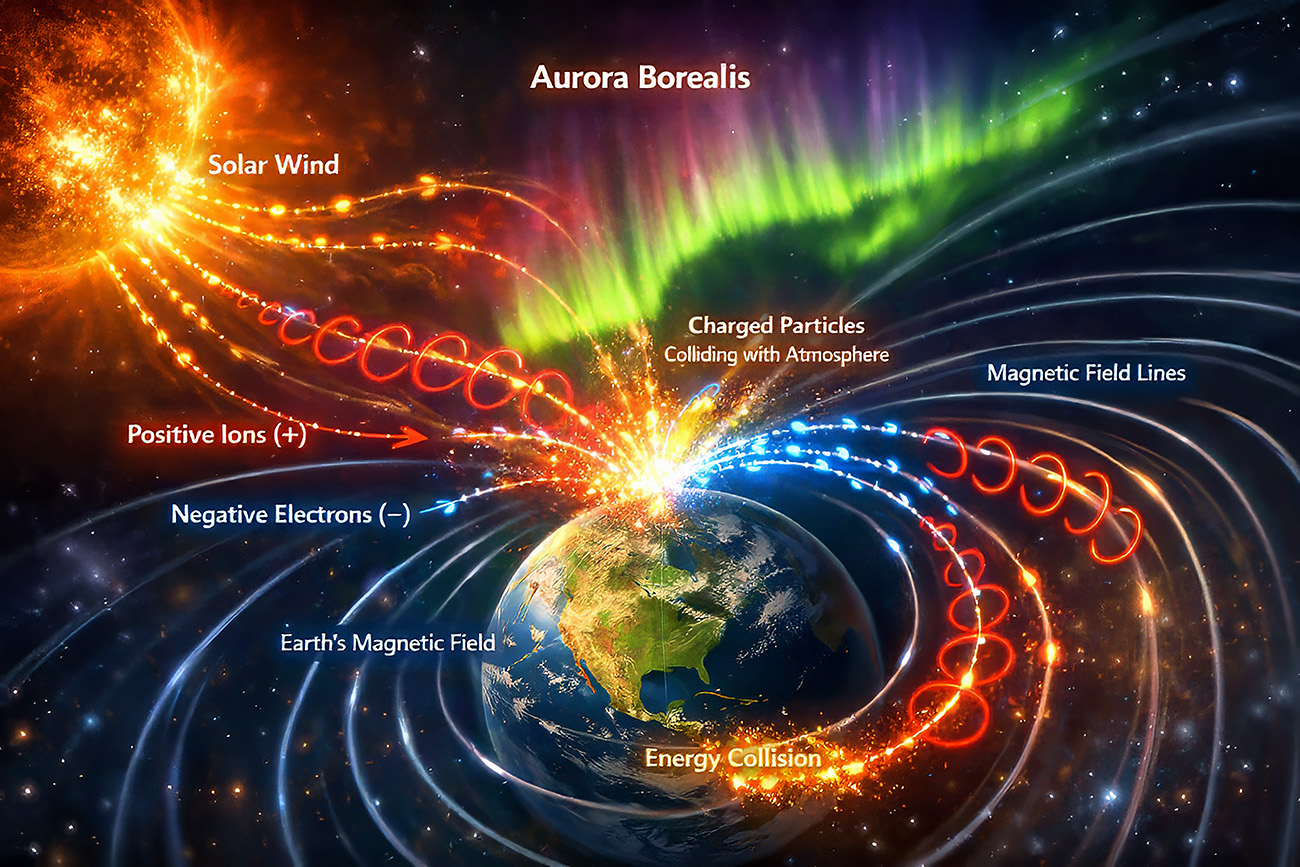
The aurora borealis isn’t just a random light show. It’s space weather made visible—the sun literally touching our atmosphere in a dance of charged particles and atmospheric gases. These particles consist of both negatively charged electrons and positively charged ions, and their interactions with the Earth's magnetic field—a natural barrier that deflects and channels solar wind—are crucial in shaping the aurora’s appearance.
When solar wind carries these charged particles toward Earth, their polarity determines how they move along the planet’s magnetic field lines. Positive and negative particles spiral differently, creating varying patterns of energy collisions with atmospheric gases. This dynamic interplay influences the intensity, color, and movement of the northern lights.
While the aurora borealis dazzles the northern hemisphere, its southern counterpart is known as the aurora australis. The aurora australis, or Southern Lights, occurs near the South Pole and is best viewed from high southern latitudes such as Tasmania, New Zealand, and Antarctica, especially during the southern winter. The same photographic techniques used for the northern lights apply to capturing the aurora australis, making it an equally rewarding subject for photographers.
A well-balanced influx of both positive and negative particles often results in vibrant, dynamic auroras with rich colors and intricate structures—offering a spectacular viewing experience. Conversely, an imbalance or weaker flow of charged particles can lead to faint, less active displays, producing what some might call a “blah” viewing. Understanding this polarity-driven behavior helps photographers anticipate the quality of the aurora and adjust their expectations and camera settings accordingly.
The colors tell a story: Capturing these vivid hues in the Arctic requires not just timing and skill, but also the right equipment—discover the essential camera gear for Arctic photography.
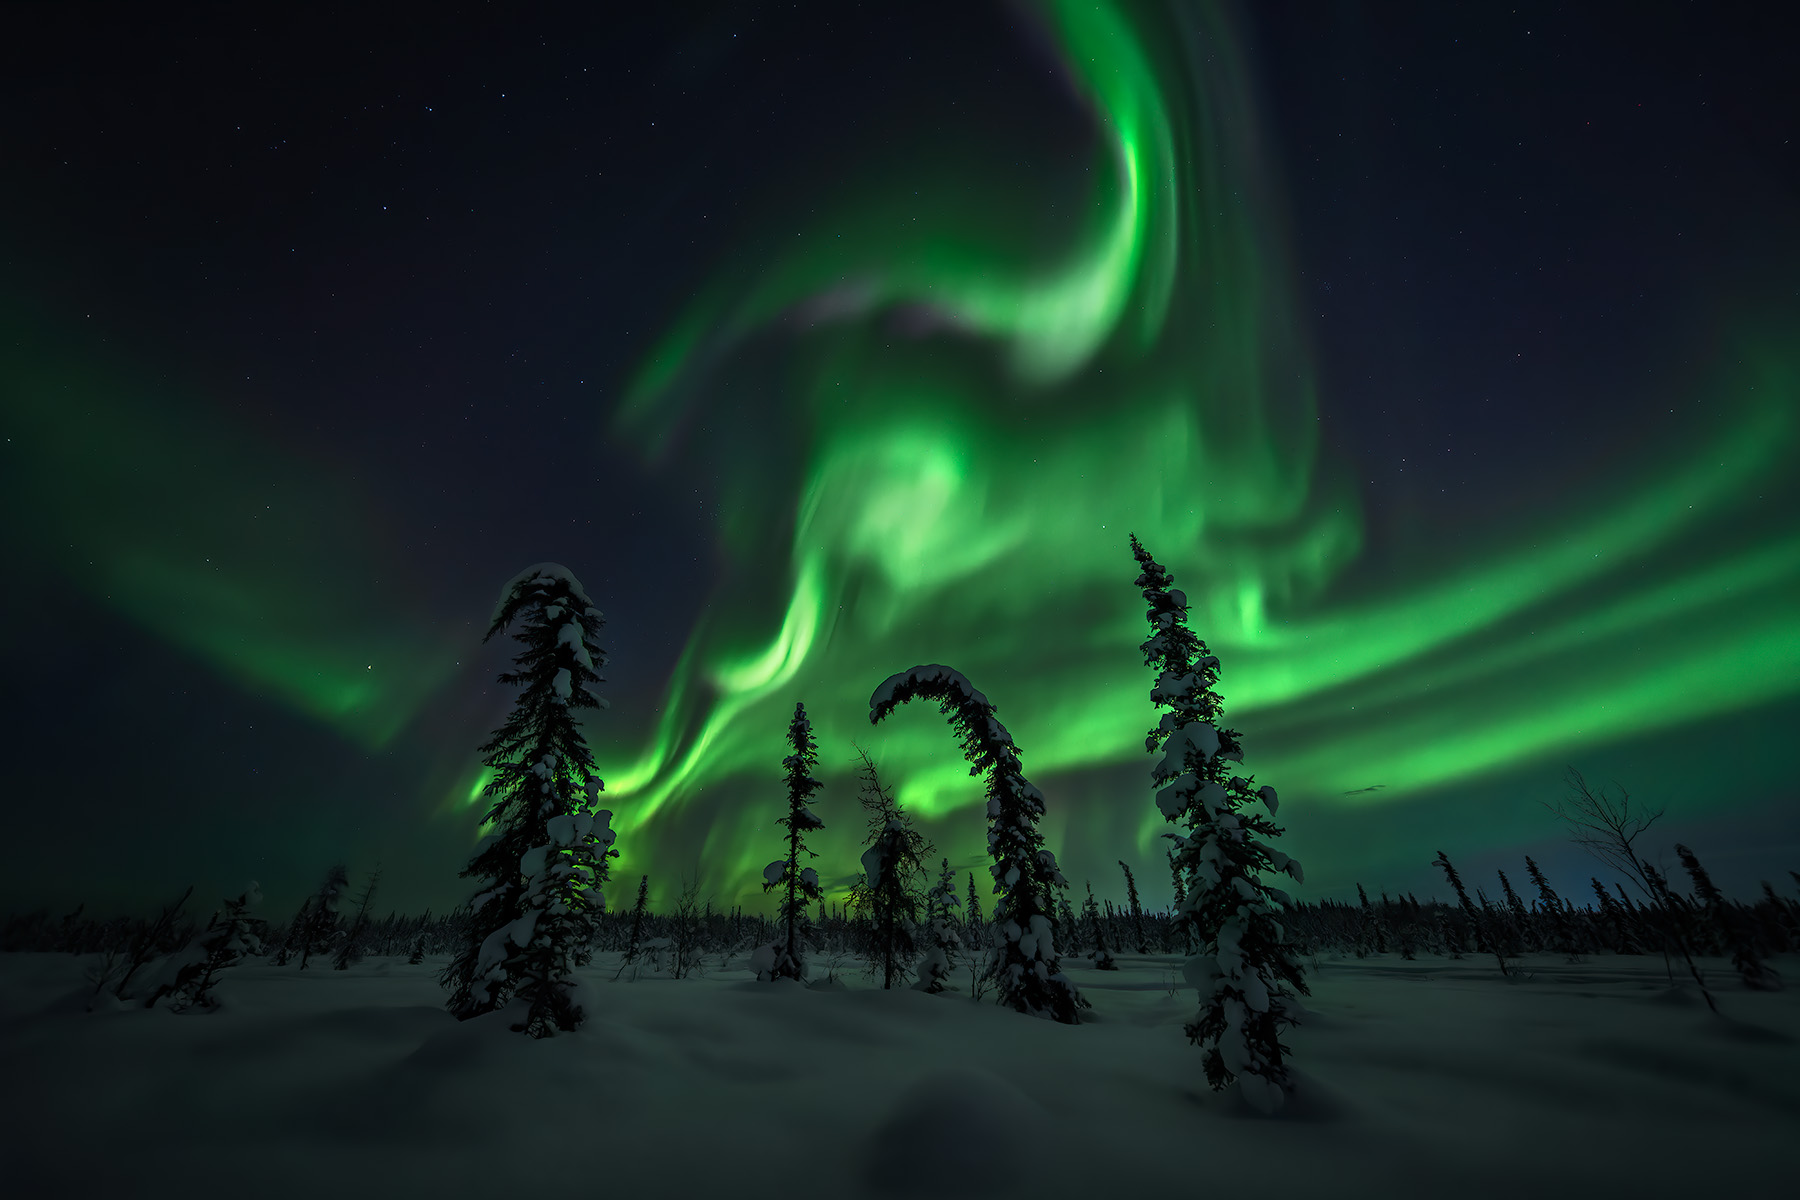
- Green (the most common): Oxygen molecules around 100–250 km altitude
- Red: Oxygen at higher altitudes, often visible during intense storms
- Purple and pink fringes: Nitrogen molecules adding their signature
Here’s what nobody tells you: your camera sees the northern lights better than your eyes do. Those long exposures gather light your retinas can’t process. A faint glow on the horizon that looks grayish-white to you? Your camera might capture screaming green curtains with magenta edges. This is both thrilling and dangerous—thrilling because you’ll get shots you didn’t expect, dangerous because you can wildly overexpose without realizing it.
When you look up at the northern lights with your own eyes, your brain is interpreting a combination of light intensity, color, and movement in real time, but it has limits. Cameras, on the other hand, collect photons over several seconds with longer exposures, stacking up light that’s invisible to your eyes in the moment. This means your photos often reveal rich colors and intricate details that seemed faint or even absent when you were standing there.
However, this advantage can trick you. Since the camera amplifies light, it’s easy to think the scene is brighter than it really is, leading to overexposed images where colors wash out and details vanish. To avoid this, it’s crucial to regularly check your histogram and adjust settings like ISO, shutter speed, and aperture accordingly. Learning to trust your camera’s preview rather than your eyes is key to capturing the northern lights true beauty without losing quality.
Solar activity follows an 11-year cycle. We’re currently in Solar Cycle 25, which reached its peak in October 2024. But here’s the insider info the tourist brochures often skip: the most spectacular northern lights displays frequently occur in the years following the solar maximum. Solar physicist Frédéric Clette explains that the most dramatic auroral shows in a solar cycle tend to happen several years after the peak—meaning for this cycle, the excitement could continue well beyond 2024, possibly through 2028.
In other words, if you’ve been dreaming of capturing the aurora borealis, now is the time to act. The past few years have already delivered extraordinary sightings, with auroras visible as far south as Texas in May 2024, and residents in the UK snapping northern lights from their own backyards. These kinds of displays simply don’t happen during weaker solar cycles.
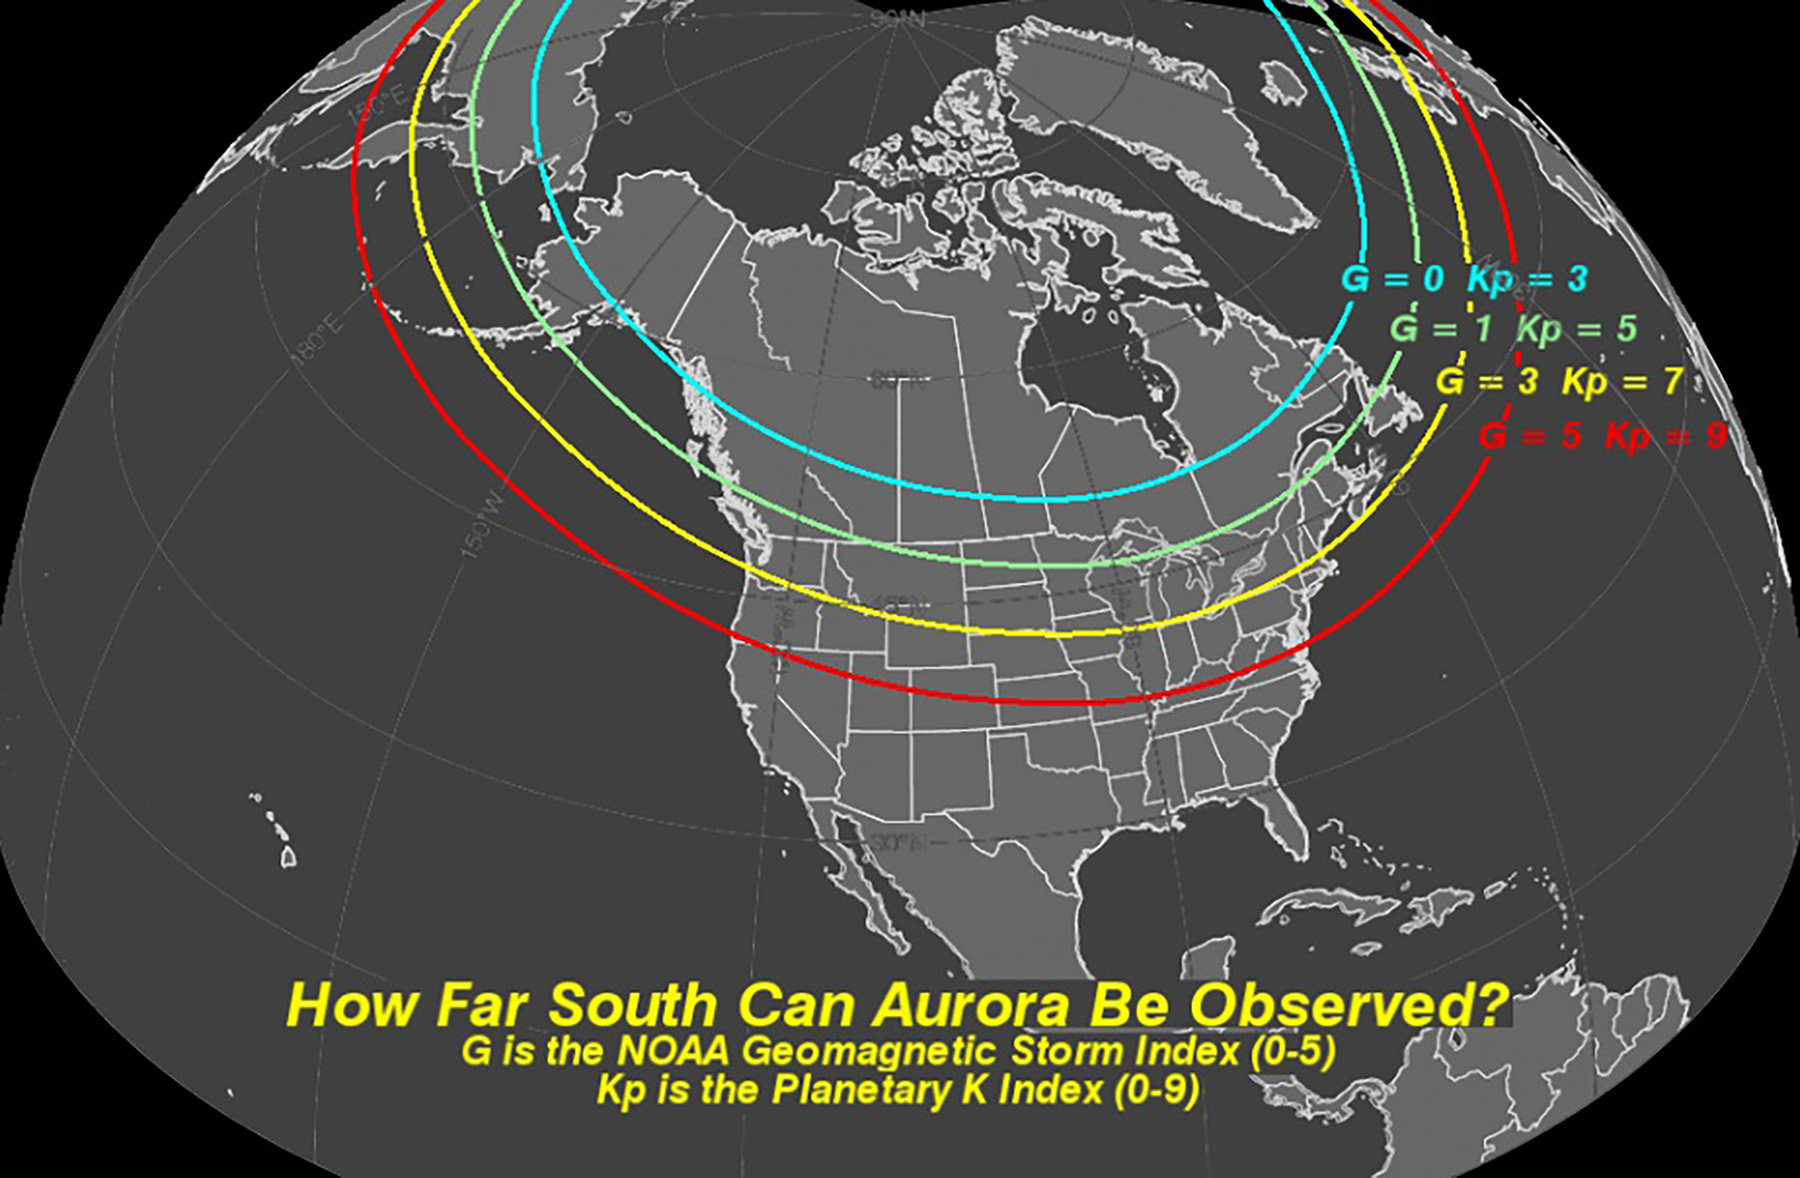
The typical auroral oval sits around 65–70° north latitude, but during major geomagnetic storms, the lights can dip much further south. During strong events (Kp 7+), auroras have been visible from Scotland, northern Germany, and most recently Mexico.
Best Places and Times to Photograph Northern Lights
Capturing northern lights photos requires three things happening simultaneously: dark skies, clear weather, and active aurora. Miss any one of these, and you’re in for a frustrating night.
If you’re near the coast, look for calm water to capture reflections of the aurora. A bright moon can actually enhance your scene by illuminating the landscape, adding depth and interest to your composition when photographing the aurora. This extra light can help balance the exposure between the sky and foreground, making your images more dynamic.
Top Destinations
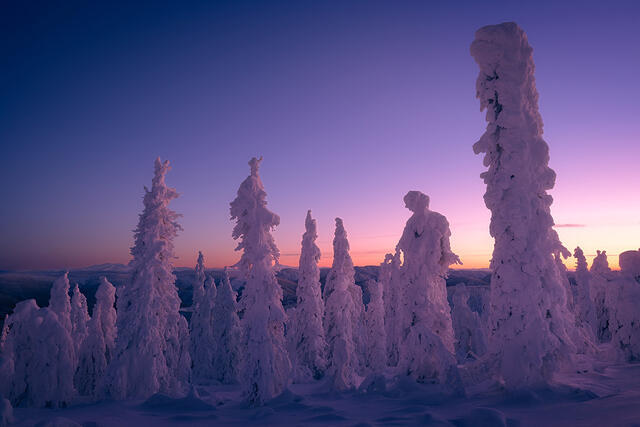
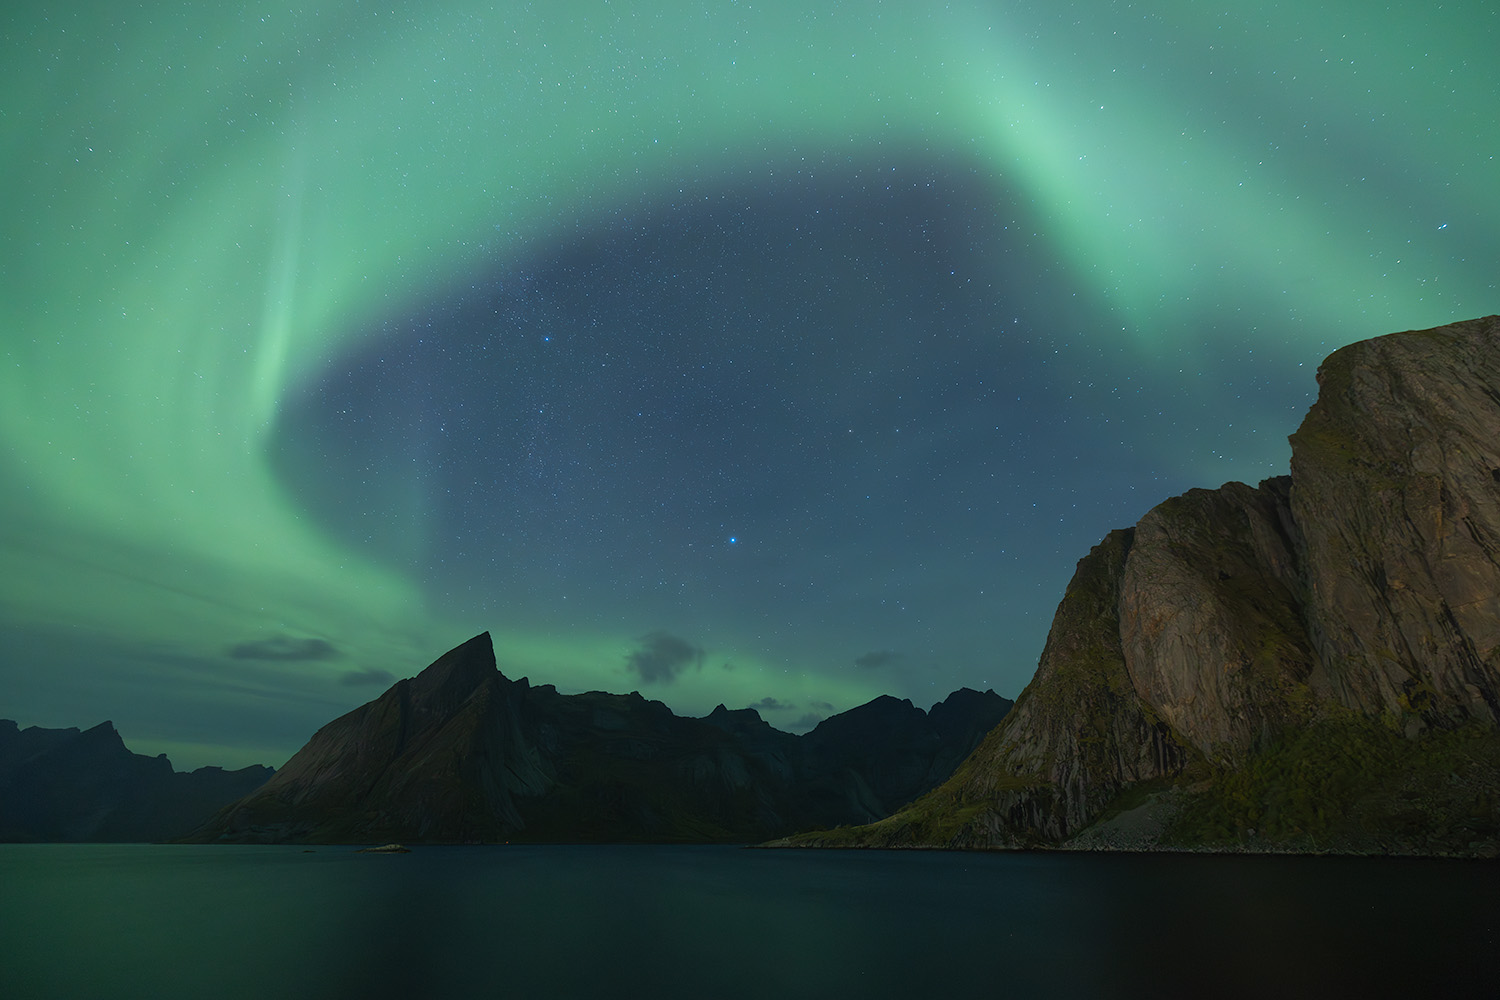
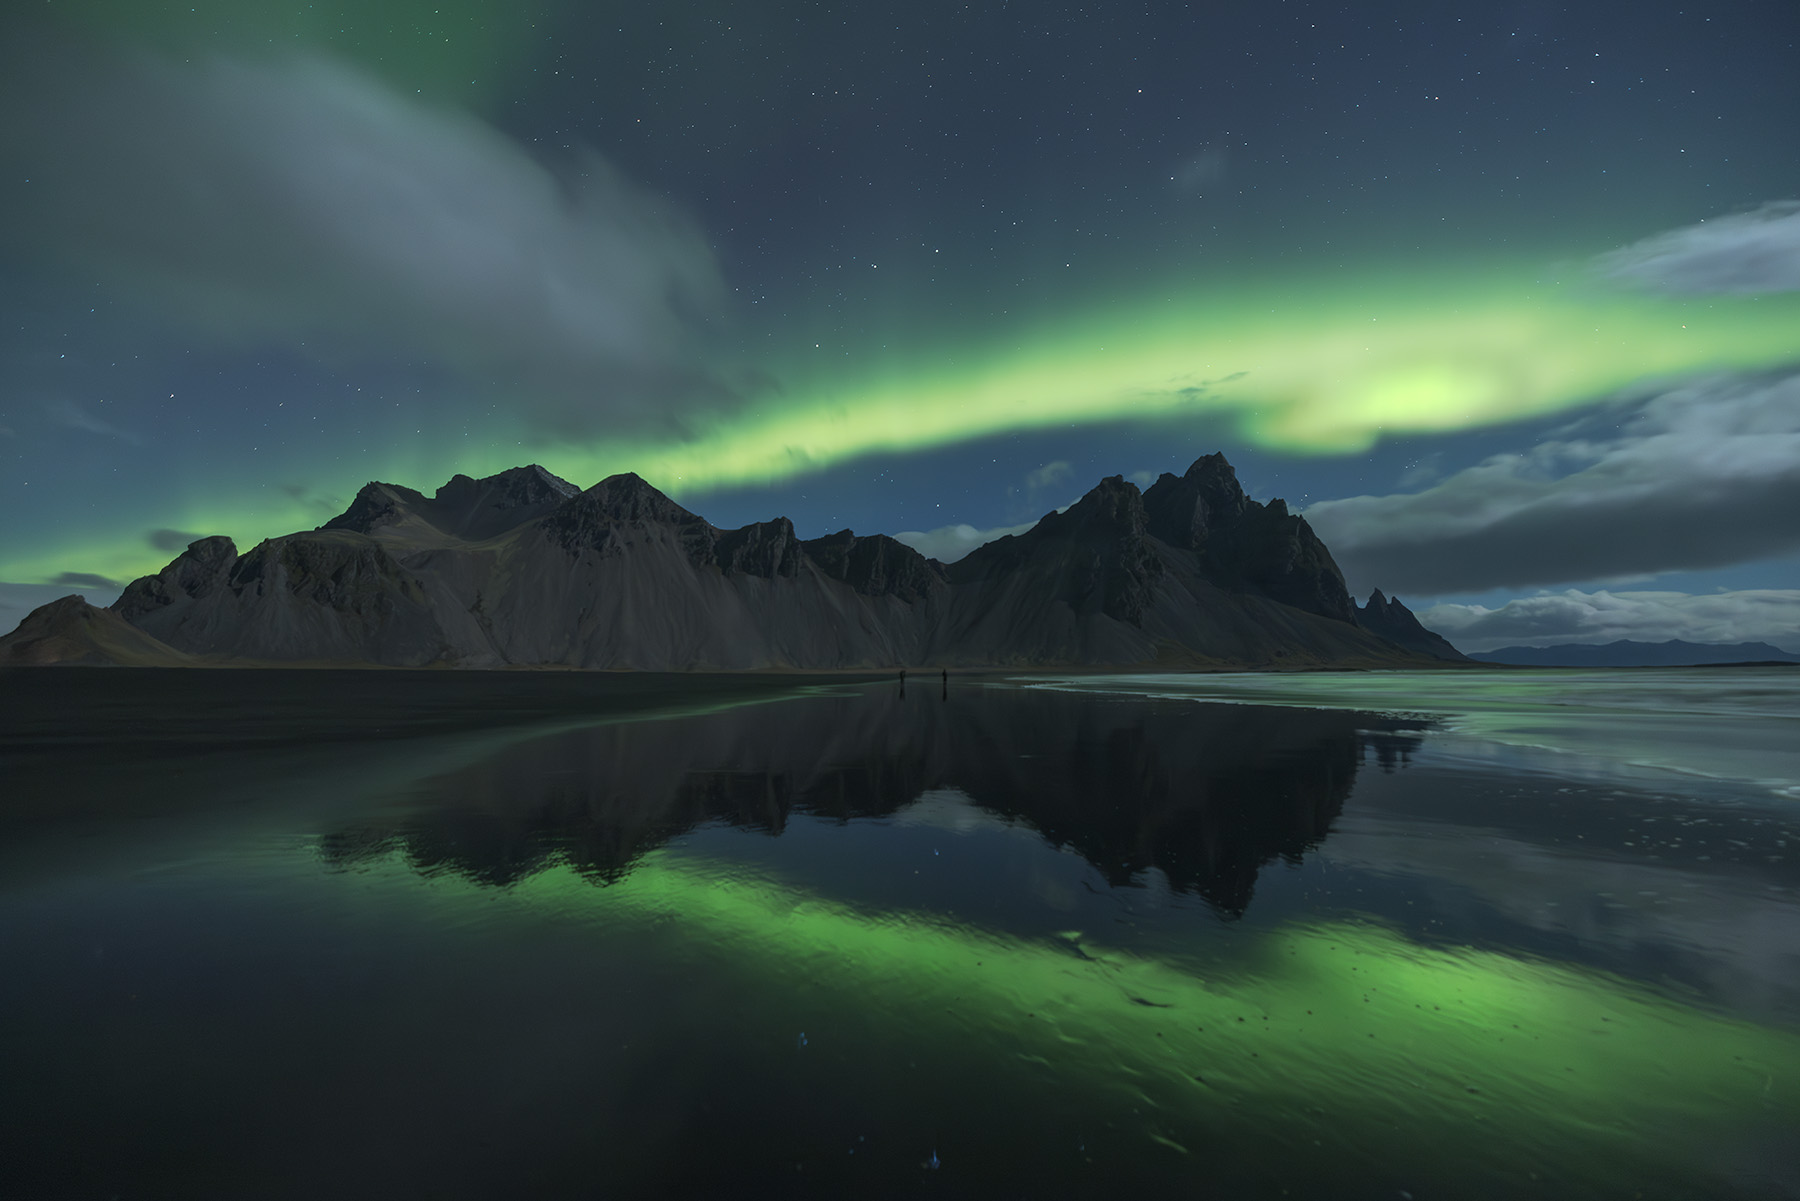
Coastal locations like northern Norway and Iceland offer something special: the chance to capture aurora reflections in fjords, still ocean water, or dramatic black-sand beaches.
Timing Your Trip
Best months: Late August through early April, with the darkest skies and best snow foregrounds typically November through March.
Moon considerations: How Moonlight Enhances Aurora Color Visibility to the Human Eye
While a full moon can sometimes wash out the faintest aurora colors in photographs, moonlight actually plays an interesting role in how we perceive the northern lights with our own eyes. The human retina contains two types of photoreceptor cells: rods and cones. Rods are far more numerous—about twice as many as cones—and are highly sensitive to low light levels, enabling us to see in near darkness. However, rods primarily detect shades of gray, meaning that under very low light conditions, our vision is mostly black and white.
Cones are responsible for color vision, but they require a certain threshold of light to become activated. During a new moon, when the sky is darkest, the ambient light is often insufficient for our cones to pick up the subtle colors of the aurora. This is why, on moonless nights, the northern lights may appear mostly monochromatic to the naked eye unless a bright substorm occurs that intensifies the aurora’s brightness enough for colors to become visible.
On nights when the moon is present, especially if there is snow on the ground to reflect moonlight upward, the increased ambient illumination helps “wake up” the cones in our eyes. This additional light means our eyes don’t have to struggle as much in the dark, allowing us to perceive more of the aurora’s colors even without the need for a powerful substorm. In other words, moonlight can subtly enhance the vividness of the aurora’s colors as seen by human observers, improving the viewing experience in a way that a camera’s sensor alone might not capture.
Be mobile: Cloud cover is the aurora photographer’s nemesis. Base yourself somewhere with flexible transport—a rental car or guided tour—so you can chase clear skies when clouds roll through. I’ve driven four hours in a single night to escape an overcast system and found crystal-clear conditions on the other side.
My week-long aurora workshops are based in locations with reliable clear-sky statistics and built-in flexibility for last-minute weather chasing. When the forecast shifts, we move.
If you’re ready to take your northern lights photography to the next level, consider joining one of my workshops. It’s a great way to learn, connect, and capture unforgettable moments under the aurora. Feel free to explore the options and find the perfect fit for your adventure.
Planning Your Aurora Shoot
Here’s something nobody tells you: planning is half the battle. You can waste an entire week in the Arctic if you’re not checking forecasts and making smart decisions about where to be each night.
Finding Dark Skies: Escape The Light Pollution
Light pollution murders aurora photography. Even modest city lights can wash out the subtle purples and reds that make great aurora photos special. Use tools like Dark Site Finder or the Light Pollution Map to identify Bortle 1–3 zones—areas dark enough to see the Milky Way clearly.
Statistics show roughly 80% success rates for aurora captures in truly dark locations versus about 20% in light-polluted areas. The difference is dramatic.
Understanding the Kp Index
The Kp index measures geomagnetic activity on a 0–9 scale. Here’s how to read it:
- Kp 0–2: Weak activity. You’ll need to be at high latitudes (67°N+) and may only see faint green arcs.
- Kp 3–4: Solid shows in Arctic regions. Bright displays with movement and structure.
- Kp 5+: Geomagnetic storm territory. Aurora visible much further south; expect dramatic, fast-moving displays.
Understanding Aurora Forecasting Beyond the Kp Index
While the Kp index is a commonly referenced metric for aurora activity, it’s important to understand its limitations and why it shouldn’t be the sole factor in your forecasting.
The Kp index is a 3-hour averaged measure of geomagnetic activity that primarily indicates how far south the aurora may be visible. However, a high Kp number does not necessarily mean the best or most intense aurora show is imminent. This is especially true for locations like Alaska, which sit directly under the auroral oval and do not rely heavily on Kp for aurora visibility.
For more accurate and timely aurora predictions, it’s essential to monitor real-time solar wind parameters, including:
- Solar Wind Speed: Faster solar wind can energize the aurora.
- Solar Wind Density: Higher density means more charged particles available to interact with Earth’s magnetic field.
- BT (Total Magnetic Field): Indicates the strength of the interplanetary magnetic field.
- Bz Component: The orientation of the magnetic field’s north-south component; a southward (negative) Bz opens Earth’s magnetic field for stronger auroral activity.

These real-time factors provide a clearer picture of when and how intense the northern lights will be. Monitoring them alongside cloud cover and local weather conditions will greatly improve your chances of capturing stunning aurora photos.
In summary, while the Kp index can give a rough idea of aurora visibility range, it is the dynamic solar wind conditions that truly dictate the quality and timing of the northern lights display.
Forecast Tools For Aurora Activity Worth Bookmarking
- NOAA Space Weather Prediction Center – The gold standard for aurora forecasts
- SpaceWeatherLive – Real-time Kp readings and aurora predictions
- Vedur.is – Iceland’s weather service with combined cloud and aurora forecasts
- Clear Outside – Detailed cloud cover predictions
- Aurora Alerts apps – Push notifications when activity spikes
Critical insight: A modest Kp 3 with clear skies beats a massive Kp 7 hidden behind thick overcast. Always check both aurora activity and cloud cover before committing to a location.
Pre-Shoot Routine
Scout locations in daylight. Identify interesting foregrounds—frozen lakes, cabins, mountains, distinctive trees. Check for safe parking and note where the northern horizon sits. When the aurora finally appears, you won’t have time to figure this out in the dark.
On my workshops, we walk through this planning process live each afternoon. By the time the lights kick off, everyone already knows exactly where they’re going to stand and what they’re going to shoot.
Essential Camera Equipment for Northern Lights Photography
Good news: you don’t need exotic camera equipment to photograph the northern lights. But some choices make the job significantly easier.
When selecting your lens, wide-angle lenses with a fast aperture (f/2.8 or wider) are ideal for capturing as much of the sky as possible and letting in more light. A zoom lens can also be very useful, allowing you to adjust your field of view to fit the expansive nature of auroras—especially when you want to frame both the sky and the landscape in your shot. Using the same lens and focal length settings throughout your shoot helps maintain consistency in sharpness and focus, which is especially important in night photography. A sturdy tripod is also essential to keep your camera steady during long exposures.
Camera Body
You need three things from your camera body:
- Full manual controls – Automatic modes fail in extreme low light
- Strong high-ISO performance – Clean files at ISO 3200–6400
- RAW capture – Essential for preserving aurora colors and recovering detail
Recommended bodies:
- Full frame: Nikon Z6/Z7, Sony A7 III/IV, Canon R6
- Crop sensor: Sony A6600, Fujifilm X-T4, Canon R7
A full frame camera produces cleaner files at high ISO settings, but don’t let anyone tell you a crop sensor camera can’t capture stunning aurora images. Modern APS-C sensors handle ISO 1600–2500 remarkably well.
But here's what I tell every workshop participant: the best camera equipment is the one in your hands right now. I've seen stunning aurora images from Fuji crop sensor bodies, older Canon DSLRs, even Micro Four Thirds cameras. Modern sensors are so capable that "not ideal" still produces beautiful results. If you're waiting to buy the perfect camera before you try aurora photography, you're wasting perfectly good aurora seasons.
Lenses
This is where your investment matters most. Night sky work pushes ISO higher than any other landscape genre — my guide to ISO in landscape photography covers how to manage the noise tradeoff at ISO 1600 and beyond.
You want:
- Focal length: 14–24mm on full frame (10–16mm equivalent on crop sensor)
- Aperture: f/2.8 at minimum, with bonus points for f/1.4–f/2.0 primes
- Manual focus ring with smooth, precise control
For more information on landscape photography in Norway, check out this Lofoten Islands Photography Guide.
Excellent choices:
- Sigma 14mm f/1.8 Art
- Sony 20mm f/1.8 G
- Nikon 14-24mm f/2.8
- Samyang/Rokinon 14mm f/2.8 (budget-friendly)
A wider lens at a fast aperture lets in more light, which means you can use a lower ISO settings and shorter shutter speed—both of which improve image quality.
Tripod and Essential Accessories
A sturdy tripod is non-negotiable for northern lights photography. You’re shooting multi-second exposures in the dark—any camera shake will ruin your image. I learned this the hard way when a cheap Amazon tripod leg snapped in -30°F temperatures. Carbon fiber tripods handle cold much better than aluminum, and be sure the leg locks are easy to operate while wearing gloves.
Essential accessories to bring:
- Extra batteries: Cold kills battery life fast. I carry at least four, keeping spares warm in an inside pocket against my body. Rotate them regularly—when one dies, swap it out and warm the depleted battery.
- Remote shutter release or intervalometer: Pressing the shutter button causes camera shake. The two-second timer helps, but a remote lets you shoot faster and capture sequences more easily.
- Headlamp with red light mode: White light destroys night vision and irritates other photographers. Red mode preserves your eyes and others’ night vision.
- Lens cloth: Frost and condensation build up on your lens front element. Check and clean it frequently to maintain image quality.
- Hand and toe warmers: These are essential. Some photographers even tape warmers to the battery compartment to extend battery life in extreme cold.
Core Camera Settings: Your Aurora Starting Point
While there is a general rule for starting camera settings when photographing the northern lights, you should always adapt your approach based on the specific conditions you encounter.
There’s no single magic setting for northern lights photography. The aurora constantly changes in brightness and speed, and so must your camera settings. But here’s a reliable starting point you can adjust in the field. If manual settings feel unfamiliar, my landscape photography for beginners guide walks through aperture, shutter speed, and ISO from the ground up.
The Foundation
- Mode: Manual mode (M) – always
- File format: RAW – preserves maximum color data and allows white balance adjustments later
- Image stabilization: OFF when using a tripod (it can actually introduce blur)
- Long exposure noise reduction: OFF (causes delays between shots; handle noise in post)
Starting Recipe
For a moderately bright, moderately moving aurora:
Adapting to Conditions
Slow, faint aurora: Long exposure times to 10–20 seconds. Push ISO settings to 3200–6400 if needed. Open aperture as wide as your lens allows.
Fast, bright aurora: Shorten shutter speed to 1–4 seconds to freeze the curtains and preserve structure. You can often drop to a lower ISO for cleaner files.
Very bright displays: You might be able to shoot at ISO 800–1600 with shutter speeds of 2–4 seconds—this produces the best quality images.
Histogram Check
Every few shots, check your histogram. You want the data pushed toward the right side without clipping the highlights. Underexposed aurora shots look muddy and noisy; properly exposed files give you more detail and cleaner colors to work with in post-processing.
Focusing in the Dark (and Actually Getting Sharp Stars)
Soft images are the single most common beginner mistake in northern lights photography. Your autofocus system simply cannot find enough contrast to lock on in a dark night sky. Manual focus is the only reliable method. Learning how to adjust the focus manually is crucial to ensure that both stars and auroras appear sharp in your night sky photos.
The Daylight Prep Method
Before night falls:
- Mount your camera on the tripod with your shooting lens attached
- Focus on a distant object at least 50 feet away (15+ large steps)
- Verify sharpness by zooming in on the LCD playback
- Use tape or a mark to lock the focus ring position
- Don’t touch the ring again
This simple preparation saves enormous frustration in the field.
Live View Focusing at Night
If you didn’t prep during daylight, or if you suspect focus has shifted:
- Switch to live view mode
- Find the brightest star in your frame
- Zoom in 10x on that star using your camera’s magnify function
- Carefully turn the focus ring until the star becomes the smallest, tightest point
- Lock focus—either with tape or simply by not touching the ring
Important: The infinity symbol on most lenses is not perfectly accurate when shooting wide open. Always verify with actual test shots and zoomed-in playback.
Additional Tips
- Use manual focus exclusively—don’t let the camera hunt
- Enable focus peaking if your mirrorless camera offers it
- Re-check focus every hour or after significant temperature changes
- If your hands are cold and shaky, use the camera’s self-timer when checking focus so button presses don’t introduce shake. Shaky hands are common in cold weather and can make it difficult to get sharp images, so using a timer or remote helps ensure your northern lights photos stay crisp.
Practice this focusing sequence on any clear night before your trip. A backyard session with visible stars teaches you the technique without the pressure of an active northern lights display.
Shutter Speed, ISO, and Aperture: Balancing Exposure and Detail
Aurora exposure is a three-way trade-off between brightness, noise, and motion blur. Understanding how these interact gives you more control in the field. Here's what nobody tells you: there is no single correct shutter speed for aurora. It changes constantly, sometimes minute to minute, as the lights shift from gentle arcs to explosive curtains.
Shutter Speed and Aurora Motion
Too long an exposure or shutter speed and delicate aurora curtains smear into shapeless blobs. Too short and you risk underexposure or excessively noisy files.
Aurora Behavior | Suggested Shutter Speed |
|---|---|
Fast, pulsing, rapidly changing northern lights | 1–4 seconds |
Moderate movement, defined curtains | 5–10 seconds |
Slow, steady arcs—an effect you can enhance by understanding the exposure triangle. | 10–15 seconds |
Very faint, barely visible glow | 15–25 seconds |
Start in the 5–8 second range and adjust your shutter speed based on what you see in your test shots.
The key is watching the movement. If the aurora is pulsing, swirling, sending curtains racing across the sky—shorten your exposure. You want to freeze that structure, capture those ribbons of light with definition, not smear them into mush.
Also: don't exceed 20 seconds regardless of aurora brightness. At 20+ seconds, stars start trailing due to Earth's rotation. Not dramatically, but enough to notice when you zoom in.
ISO Settings: The Gain Control
Think of ISO as amplification. Higher ISO settings brightens your image but introduces noise. The goal is to use the minimum ISO setting that gives you a proper exposure.
Priority order:
- Open aperture first (more light without noise penalty)
- Lengthen shutter second (if aurora speed allows)
- Raise ISO last (only as much as necessary)
Full-frame sensors stay clean to ISO 3200–6400. Crop sensors show more noise above ISO 1600–2000.
Aperture Considerations
Wide apertures (f/1.4–f/2.0) gather more light but introduce shallow depth of field and more optical aberrations like coma (star points becoming comet-shaped at frame edges).
Stopping down to f/2.8–f/4 sharpens your stars and foreground but requires higher ISO or longer exposure time to compensate.
Decision Tree
Start here: f/2.8, ISO 3200, 5 seconds
- If too dark: Open aperture to f/2 or f/1.8 → If still dark, lengthen to 8 seconds → If still dark, push ISO to 4000–5000
- If too bright or smeared: Shorten shutter to 3–4 seconds → Lower ISO to 1600–2000
Take several test shots at the beginning of each session. Snow, moonlight, and aurora intensity all affect your optimal settings.
Composition: Turning a Green Sky into a Strong Photograph
A bright aurora alone doesn’t guarantee a compelling image. Composition still matters—perhaps more than ever, because the drama of the sky can distract from weak framing.
Foreground Is Everything
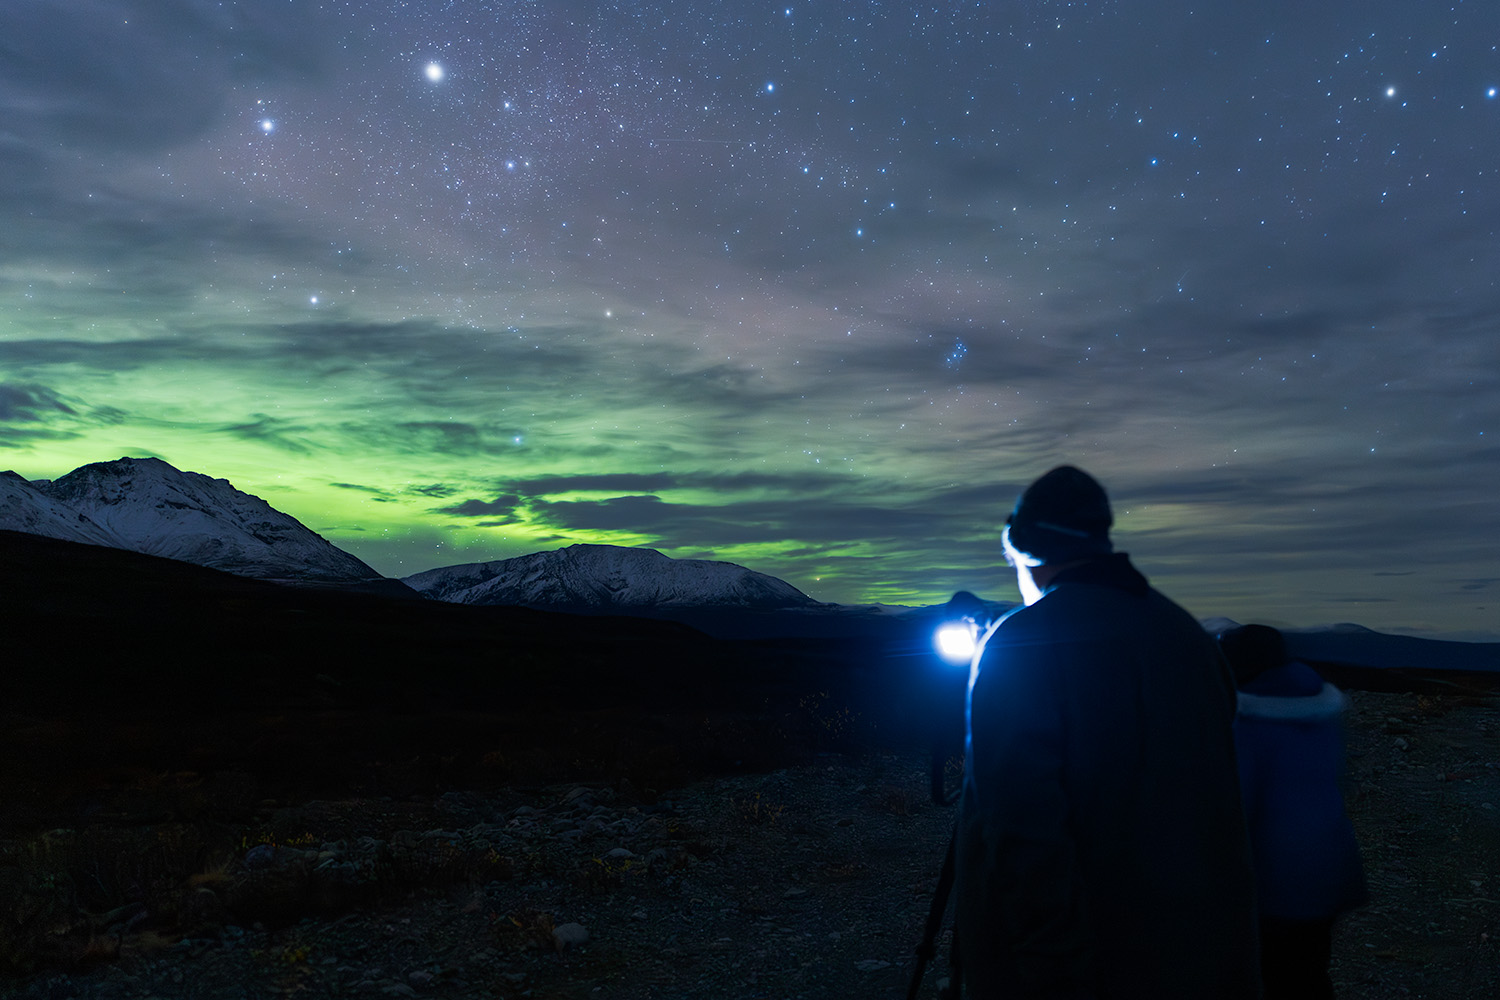
The difference between a snapshot and a photograph often lives in the foreground. Look for:
- Snow-laden trees or distinctive silhouettes
- Cabins, churches, or other structures
- Frozen lakes with mirror-like reflections
- Mountain ridges creating leading lines
- Roads or rivers drawing the eye toward the horizon
A wide angle lens at 14–24mm lets you capture both dramatic sky and compelling foreground in a single frame.
Scout in Daylight
When the aurora explodes overhead at 11 PM is not the time to figure out your composition. Walk the area during daylight hours:
- Find clean horizon lines free of distracting elements
- Identify strong shapes that will read as silhouettes
- Note which direction is north (where most aurora activity appears)
- Check for safe footing and stable tripod positions
Composition Techniques
- Leading lines: Shorelines, ridges, and roads that point toward the aurora
- Rule of thirds: Place the horizon low to emphasize sky, or high to feature reflections
- Frame within a frame: Tree branches, rock arches, or cabin doorways
- Vertical vs. horizontal: Shoot both—vertical emphasizes aurora height, horizontal captures sweeping curtains
Natural Light for Foregrounds
Moonlight can be your friend. A quarter or half moon illuminates snow and mountains with soft, natural light, eliminating the need for artificial light painting. The key is balance—enough foreground detail without overwhelming the aurora.
During my workshops, I often pre-scout multiple compositions during our afternoon sessions. When the lights kick off, everyone steps into pre-planned positions and focuses entirely on timing and execution when it comes time to photograph the northern lights.
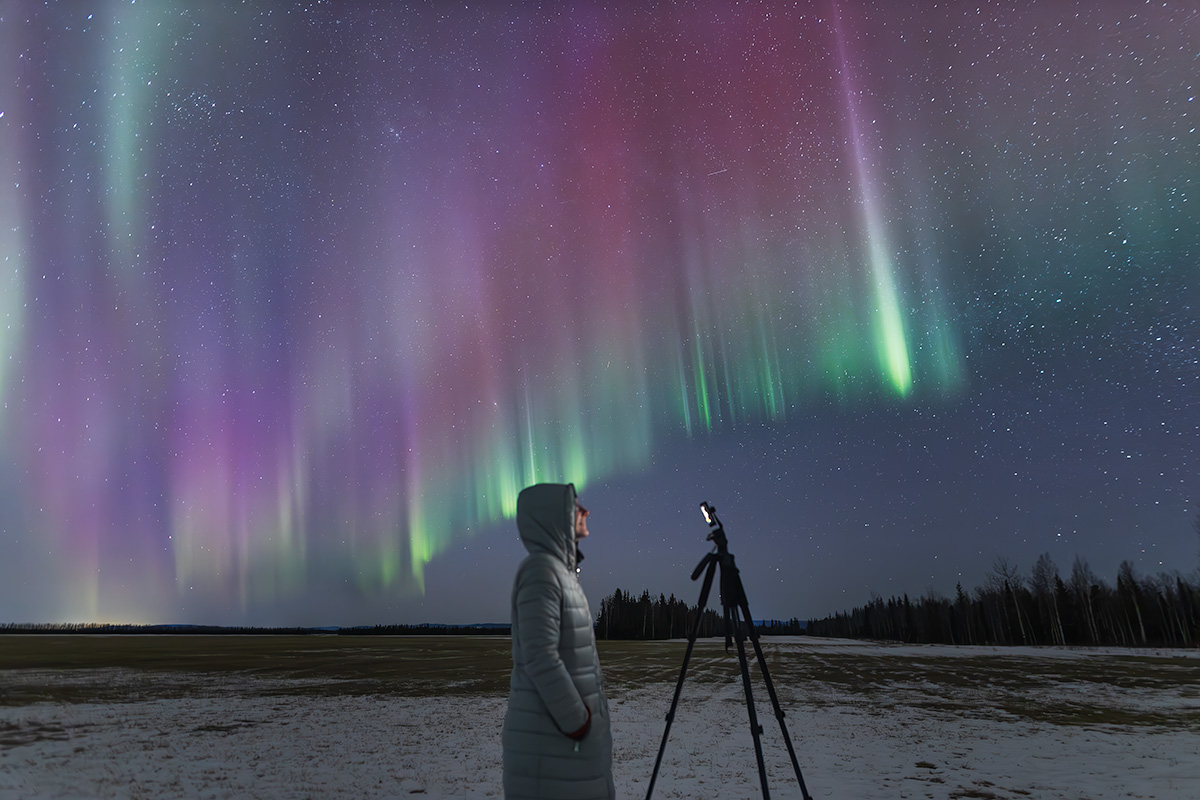
Including People and Storytelling in Your Aurora Images
Adding a human figure transforms an aurora photograph from technical achievement to emotional story. Suddenly there’s scale, there’s wonder, there’s someone experiencing what the viewer wishes they could experience.
Simple Silhouettes
The easiest technique: position someone on a ridge, beside a cabin, or on a frozen lake, backlit by the aurora or distant ambient light. Expose for the sky, and your subject becomes a dark silhouette against the glowing curtains.
Tips for success:
- Have your subject stand completely still for the entire exposure
- Position them looking into the aurora, not at the camera
- Give clear direction: “Freeze until I say done”
- Use hand signals or whisper—headlamp flashes ruin other photographers’ shots
Light Painting People
For a visible subject rather than silhouette:
- Set your exposure for the aurora (typically 5–15 seconds)
- During the exposure, briefly illuminate your subject with a dim headlamp or flashlight
- Keep the light burst under one second—just enough to register
- Aim from the side or above for more dimensional lighting
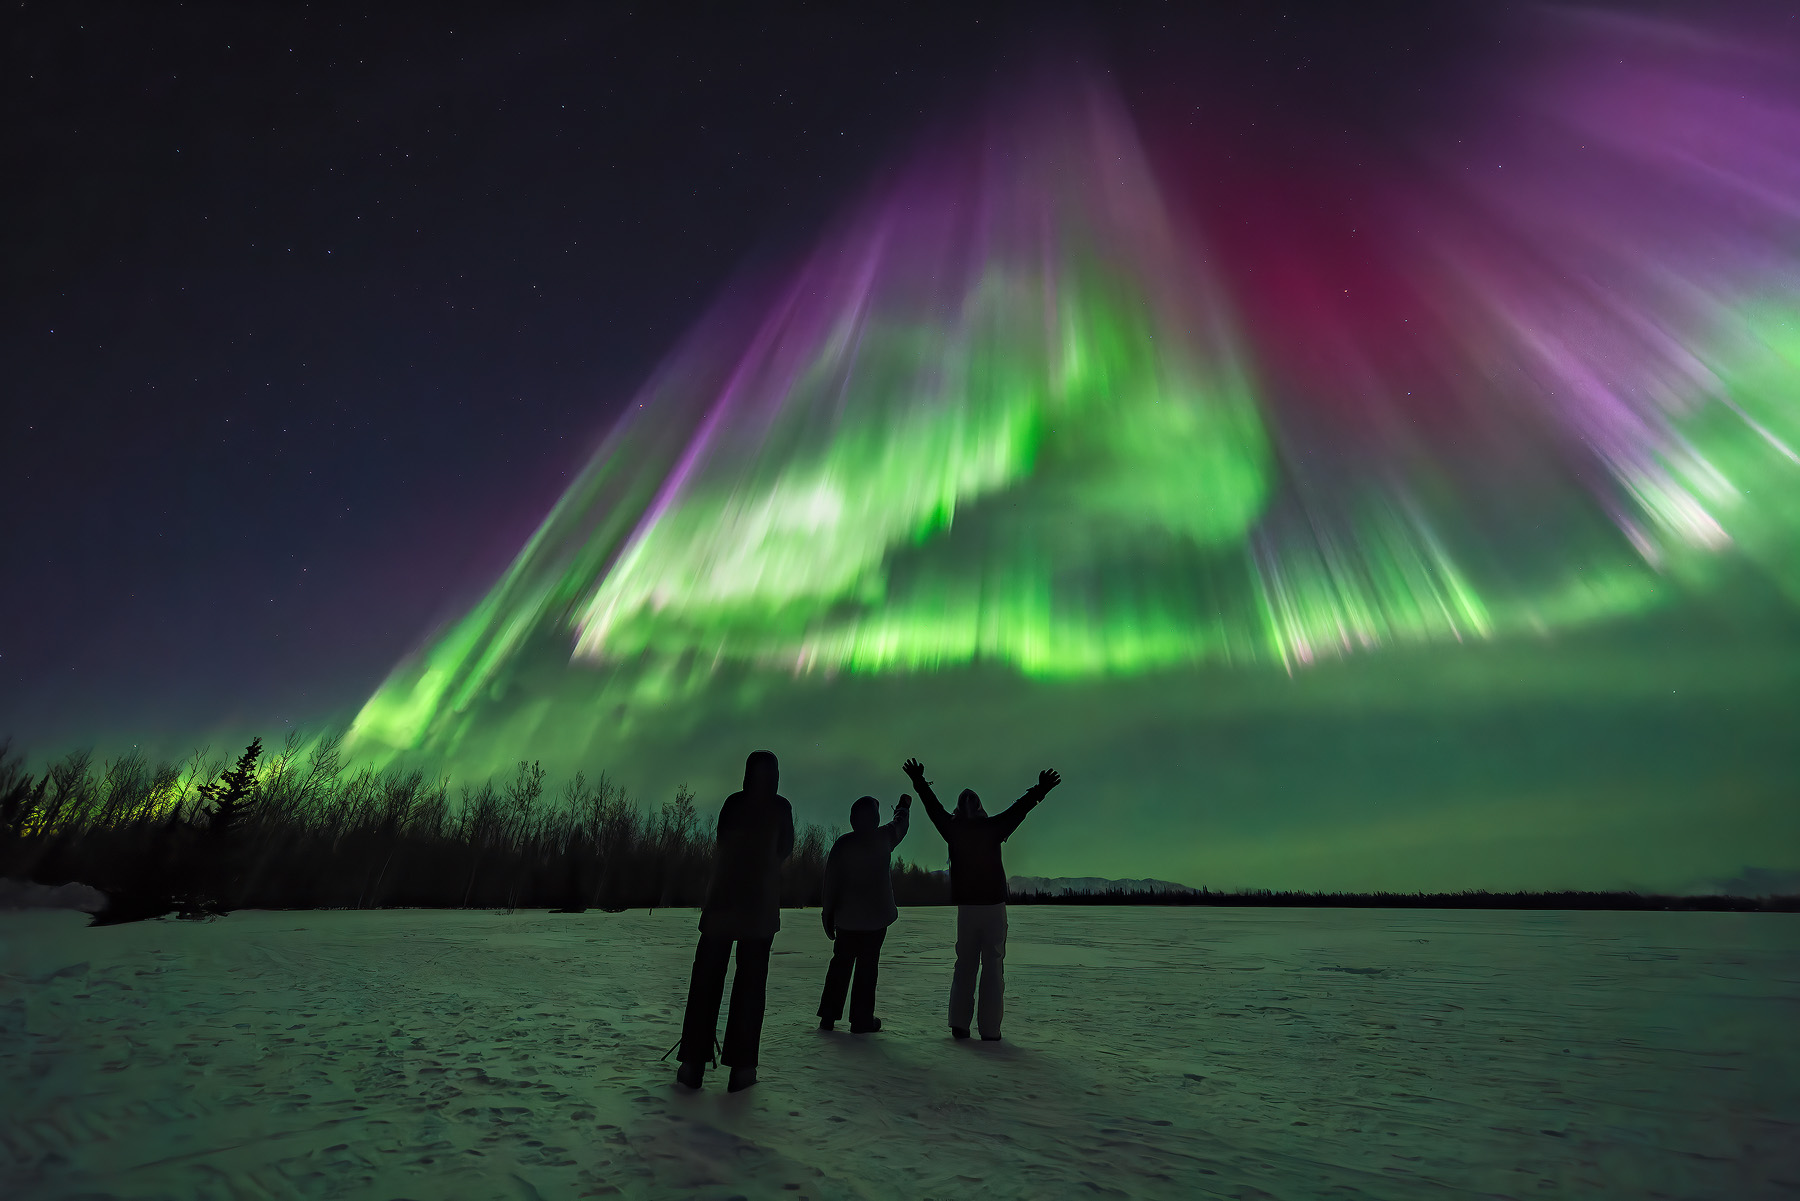
Storytelling Moments
Move beyond static poses. Try:
- Someone pouring a hot drink from a thermos
- A figure walking on a frozen lake with a lantern
- Hands held up toward the sky in wonder
- Two people standing together, experiencing the moment
Etiquette and Safety
- Never swing bright headlamp beams through other photographer's frames
- Keep your subject warm between takes—cold models are unhappy models
- Watch for icy surfaces near water
- Communicate clearly about when exposures start and end
Smartphone Northern Lights Photography
How to photograph the northern lights with Your iPhone
Here's a question I get at almost every workshop and northern lights tour: "Can I really photograph the northern lights with just my phone?"
Yes. Genuinely yes. Your iPhone or Android won't match what a dedicated camera produces, but during strong displays, phone aurora photos can be surprisingly impressive. I've seen workshop participants capture images on their iPhones that made them tear up—that first glimpse of green light on their own screen, proof that this is real, they're actually here.
The key is Night Mode, available on iPhone 11 and newer, recent Samsung Galaxy models, and Google Pixel phones. Night Mode extends exposure time and uses computational processing to reduce blur and noise.
Here's how to maximize your iPhone aurora shots:
- Stabilize your phone completely. A small phone tripod costs $20 and makes a dramatic difference. No tripod? Prop your phone against something solid—a rock, a backpack, a car tire. Holding it in your hands won't work for exposures this long. (Avoid telescoping mono tripods; you need a sturdy tripod with a wide base for stability. Telescoping tripods tend to be flimsy and brittle in cold temperatures, and even a slight breeze can cause them to sway, resulting in blurry shots. )
- Maximize the exposure time. In Night Mode, you can adjust the exposure duration. Slide it to maximum—often 10-30 seconds when the phone detects it's stable on a tripod.
- Tap a star to lock focus. This sets focus at infinity and prevents the phone from trying to focus on something closer.
- Use the timer or volume button. Touching the screen to capture causes shake. Set a 3-second timer or use your earbuds as a remote trigger.
- Turn off the flash. It does absolutely nothing for aurora photography except ruin your night vision.
- Keep your phone warm. Phone batteries hate cold even more than camera batteries. Keep it in your pocket between shots and only bring it out when you're ready to capture.
If you want more control, apps like NightCap Camera or ProCam let you manually set ISO and shutter speed. But Night Mode on recent iPhones and Pixels does a remarkable job on its own—especially during strong displays when there's plenty of light to work with.
For a deeper dive into specific gear recommendations, check out my aurora photography gear guide.
Let’s be realistic: your phone will never match a dedicated camera kit for aurora photography. But modern smartphones with computational photography can produce surprisingly decent results—and you always have your phone with you.
Essential Setup
- Tripod or clamp: Non-negotiable. Handholding produces blurry messes.
- Remote or self-timer: Even the shutter button press can introduce shake
- Night mode or Pro mode: These automatically activate longer exposures
Phone Settings
If your phone offers manual mode controls (Pro mode on Android, specialized apps on iPhone):
Tips for Better Phone Aurora Shots
- Lower screen brightness to preserve your night vision
- Turn off flash completely
- Shoot multiple frames and select the sharpest
- Consider exposure compensation slightly negative—phones tend to over-brighten night scenes
- Accept the limitations: noise will be higher, detail will be lower, dynamic range will be compressed
That said, recent flagship phones in good conditions (Kp 7+ storms, clear skies) can produce images worthy of social media or small prints.
On tours and workshops, I help guests dial in phone settings alongside their primary cameras. Your phone makes a great backup capture tool while your main camera handles the heavy lifting.
Dealing with Cold, Condensation, and Other Real-World Problems
The Arctic environment is often the real challenge. Sub-zero temperatures, howling winds, and condensation issues have ruined more aurora shoots than incorrect camera settings.
Clothing Strategy
You’ll be standing still for hours in extreme cold. Dress accordingly:
- Base layer: Merino wool or synthetic moisture-wicking
- Mid layer: Down or synthetic insulation
- Outer layer: Windproof, breathable shell
- Boots: Insulated, rated for Arctic temperatures
- Gloves: Thin liner gloves under thick mittens—you need finger dexterity for camera controls
- Head: Warm hat that fits under a hood
Battery Management
Cold devastates battery life. Expect 2–3x faster drain below -10°C (14°F).
- Carry 3–5 fully charged spare batteries
- Keep spares in an inner pocket against your body
- Rotate batteries every 30–45 minutes before they die completely
- Don’t wait for the battery warning—swap proactively
Condensation Prevention
Moving a cold camera into warm air causes instant lens fog. Moving a warm camera into cold air can cause internal condensation.
Prevention strategy:
- Leave gear in your camera bag when transitioning between temperatures
- Allow 20–30 minutes for gradual acclimatization
- Keep a microfiber lens cloth in an inner pocket (warm and dry)
- Consider lens warmers for extended sessions in humid conditionsPRO TIP: Put your camera in a 2 gallon Zip-lock baggie outside and close it before bringing it in.
Tripod Issues
- Spread legs wide and press them into snow for stability
- Hang your camera bag from the center column to add mass
- Check that knobs and locks still function—they can freeze or stiffen
- Carbon fiber tripods handle cold better than aluminum
Safety Reminders
- Watch for icy banks near fjords and rivers
- Avoid wandering into deep snowdrifts
- Tell someone your planned location and expected return time
- Carry a charged phone and basic emergency supplies
- Stay hydrated—dehydration accelerates cold stress
- Always check the local weather forecast
Post-Processing: Bringing Out the Magic Without Overdoing It
Good capture in-camera makes editing gentle and quick. Heavy “rescue” edits almost always look artificial. That said, thoughtful processing brings out what the camera captured in ways your naked eye might have missed.
Adobe Lightroom is a powerful tool for editing RAW images, allowing you to adjust brightness, contrast, and saturation to enhance your photographs.
Basic Workflow
- Import RAW files into Lightroom, Capture One, or similar
- Adjust exposure to match what you remember seeing (or slightly brighter)
- Set white balance to natural-looking greens—typically 3200–3800K
- Apply gentle contrast through tone curve or clarity slider
- Reduce noise selectively—stronger in shadows and sky, gentler on foreground textures
- Correct lens distortion and chromatic aberration
- Crop and straighten if needed
White Balance
The forgotten setting that makes or breaks your photographs. Too warm, and greens look yellow. Too cool, and they look artificial.
Start around 3400K and adjust until the greens match your memory. Since you shot RAW, you have complete flexibility here.
Noise Reduction
High ISO files need noise reduction, but heavy-handed processing creates that ugly “plastic” look. Modern AI-based tools in Lightroom 2024/2025 reduce noise while preserving more detail than older algorithms.
Apply luminance noise reduction first. Accept that some grain is natural and preferable to over-smoothed surfaces.
Saturation and Vibrance
The temptation to crank saturation is real. Resist it. Over-saturated photos look radioactive and fake. If you have to ask “is this too much?”—it probably is.
Compare your processed image against your memory of the actual display. That’s your reality check.
Lens Corrections
Apply profile corrections for distortion and vignetting. Fix chromatic aberration on bright stars near frame edges. These are technical corrections, not creative choices—use them consistently.
Guests who attend my workshops receive sample RAW files plus step-by-step editing walkthroughs to replicate a clean, natural look that holds up to scrutiny. If you're ready to take creative control of your camera, my in-depth guide to camera modes can help you understand the settings behind the images you create.
Checklist and Quick-Start Recap
Packing for your trip? Here’s your at-a-glance reference.
Gear Checklist
- [ ] Mirrorless camera with manual mode and RAW capability
- [ ] Fast wide angle lens (14–24mm, f/2.8 or faster)
- [ ] Sturdy tripod (carbon fiber preferred)
- [ ] Remote trigger or use 2-5 second self-timer
- [ ] 3–5 spare batteries (kept warm)
- [ ] Extra memory cards (32GB+ each)
- [ ] Headlamp with red mode
- [ ] Lens cleaning cloth
- [ ] Warm, layered clothing
- [ ] Hand warmers
How To Take Northern Lights Photos: Quick Start Summary
Settings Cheat Sheet
Planning Steps
- Check Kp index and aurora forecast daily
- Monitor cloud cover maps for clear skies
- Scout 2–3 backup locations in different directions
- Identify dark sky zones away from city lights
- Check weather forecast for wind and temperature
Field Routine
- Arrive at location before dark
- Set up tripod and camera while light remains
- Focus on distant object or bright star
- Take test shots and verify settings on LCD
- Shoot continuously when aurora appears, adjusting as brightness changes
- Check histogram regularly
- Rotate batteries before they die
Your Aurora Adventure Starts Now
Standing under the aurora borealis is one of those experiences that changes how you see photography—and maybe how you see everything. The dancing light, the frozen silence, the feeling of witnessing something ancient and alive. It’s worth the cold fingers and the late nights and the missed forecasts.
I’ve spent countless hours under the northern lights, and I’m still not over it. Every display is different. Every photograph teaches me something new.
Whether you're chasing lights solo across Iceland or taking northern light photos in the remote wilderness of Alaska, I hope this guide helps you capture something worth keeping. The techniques work. The gear recommendations come from real field experience. The rest is just you and the sky.
And if you prefer hands-on learning—practicing these techniques under actual aurora with someone who’s been doing this for years—my Northern Lights photography workshops are designed exactly for that. Small groups, flexible scheduling based on weather forecasts, and nights spent doing this together instead of figuring it out alone. If you're planning an Alaska trip and want to extend beyond the aurora, my guide to brown bear encounters at Lake Clark covers the coastal bear viewing that pairs well with a fall aurora itinerary.
Clear skies and bright auroras. See you out there.