ISO and Image Quality for Landscape Photography
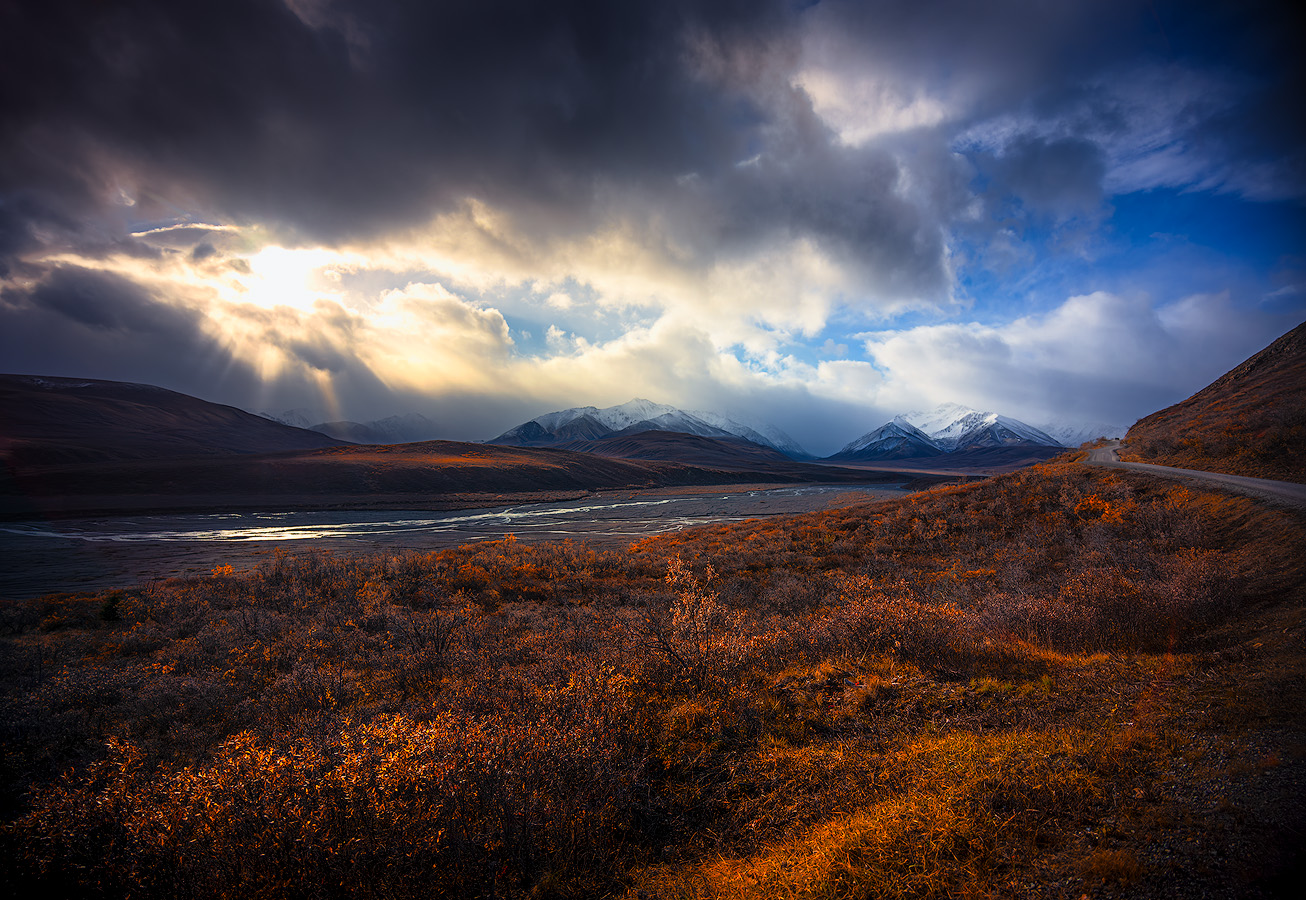
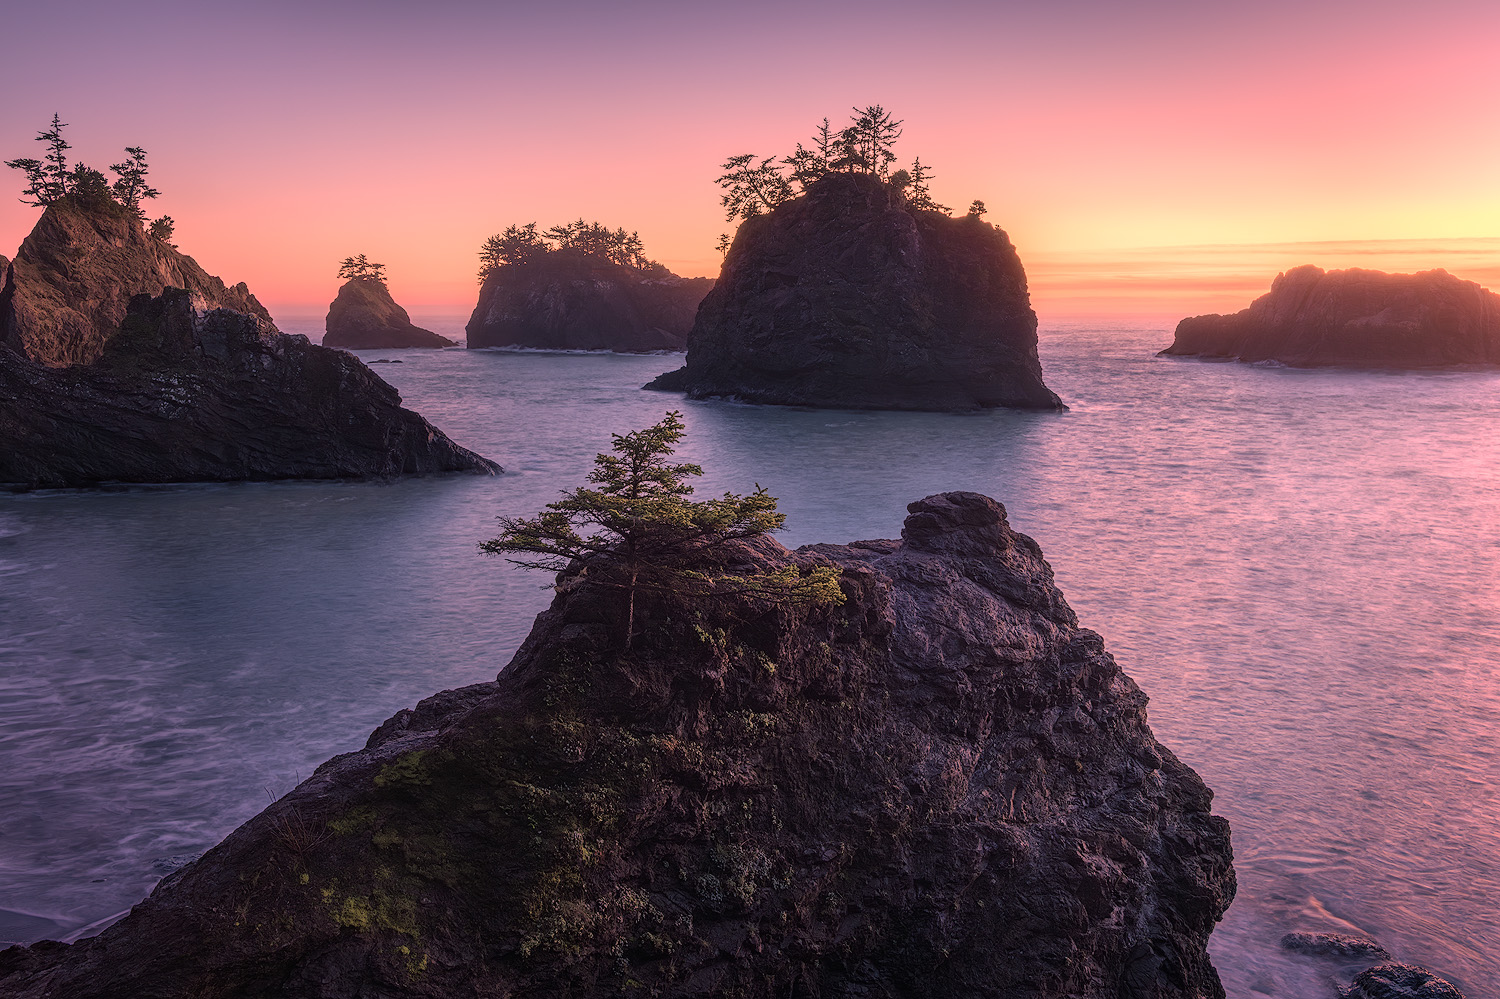
Light breaking through clouds over the Alaska Range with autumn tundra at my feet — Denali National Park, ISO 100, tripod. This is what base ISO delivers: full dynamic range from the brightest god rays to detail in the shadowed valley, no compromises in the file. © Face The Outdoors Photography
ISO is the setting most landscape photographers think about least — and that's actually the right instinct. For most of what we do, the answer is simple: keep it as low as possible. ISO 100, tripod, done.
But knowing when to break that rule — and understanding why it exists in the first place — is what separates photographers who capture beautiful and impactful images from those who end up fighting noise in editing.
ISO controls your camera sensor's sensitivity to light, and every decision you make about it directly affects the image quality of the final file. There is no one correct ISO for every situation — the best ISO depends on lighting conditions and the specific requirements of each scene.
This guide covers how ISO works in landscape photography, when to keep it low, when to raise it, and how to manage the tradeoff between light and noise so you're making intentional choices instead of guessing. If you're just getting started with camera settings, my landscape photography for beginners guide covers the basics before you dive into ISO specifics.
Mastering ISO alongside shutter speed and aperture is essential for adapting to environmental challenges and consistently producing the highest quality images.
What Is ISO and How Does It Affect Your Images?
ISO measures how sensitive your camera sensor is to light. A low ISO number — like ISO 100 or ISO 200 — means the sensor is less sensitive, requiring more light to create a proper exposure.
A high ISO — like ISO 1600 or ISO 3200 — means the sensor is more sensitive, letting you shoot in darker conditions or with a faster shutter speed. Doubling the ISO value increases image brightness by one stop, allowing you to use a quicker shutter speed or a narrower aperture without changing the overall exposure.
Think of it like turning up the volume on a faint radio signal. The signal gets louder, but so does the static. In photography, that static is called digital noise — visible grain, colored speckles, and reduced detail that degrades your image quality, especially in shadow areas.
The camera sensor's ability to collect and process light is fundamental to digital photography, and ISO directly influences how that sensitivity is utilized.
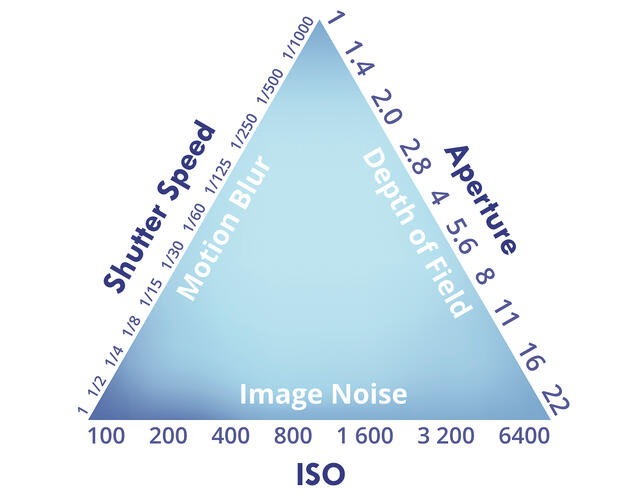
ISO works alongside aperture and shutter speed as the third element of the exposure triangle. Together, these three camera settings control how much light reaches the sensor and how the camera captures the scene.
Changing one always requires adjusting the others to maintain a correct exposure. The key tradeoff: higher ISO settings let you shoot in low light or freeze motion, but it comes at the cost of more noise and less dynamic range.
Lower ISO preserves maximum detail, color accuracy, and tonal smoothness — but it requires either more light or longer exposure times to compensate.
Why Low ISO Matters for Landscape Photography
For landscape photographers, image quality is everything. We shoot for large prints, detailed crops, and files that hold up under close inspection. That means keeping ISO at its base setting — usually ISO 100 — whenever possible.
The best ISO for landscape photography is always the lowest ISO you can get away with, but choosing the right one depends on the specific lighting conditions and your creative goals.
What You Get at ISO 100
At your camera's base ISO, the sensor performs at its best. You get the maximum dynamic range — meaning you can recover more detail from both highlights and shadows in editing.
Colors are richer and more accurate. Tonal transitions are smooth. Noise is virtually nonexistent.
This matters because landscape photography often involves scenes with extreme contrast — a bright sky against a dark foreground, direct sunlight next to deep shade. The more dynamic range your file retains, the more flexibility you have to balance those extremes without introducing artifacts or banding.
Shooting in RAW format at base ISO gives you the most latitude for adjustments, making it easier to achieve your desired final image.
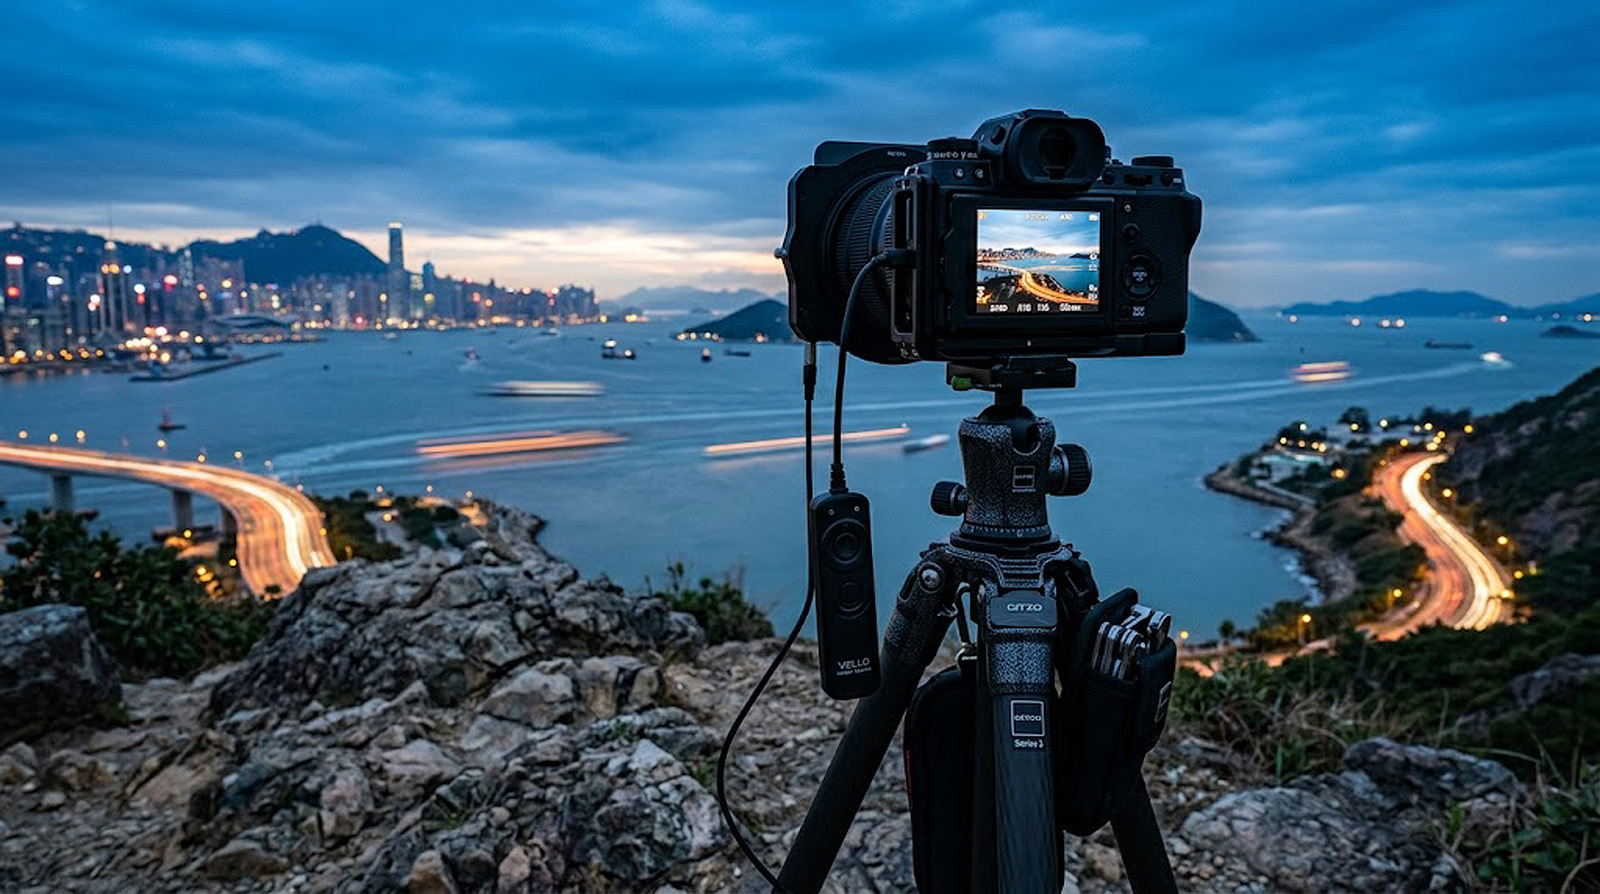
The Tripod Makes Low ISO Possible
The reason most landscape photographers can shoot at ISO 100 most of the time is the tripod. With a stable platform, you can use slow shutter speeds — 1 second, 5 seconds, 30 seconds — to let enough light reach the sensor without raising ISO.
The camera sits perfectly still while the shutter is open, collecting light over time rather than amplifying the signal.
This is the fundamental trade: instead of making the sensor more sensitive (raising ISO and adding noise), you give the sensor more time (slowing the shutter speed on a tripod).
The result is a cleaner, more detailed file with the full dynamic range your camera is capable of producing. It's the single most important habit in landscape photography — low ISO, tripod, slow shutter.
When shooting a static scene in good light, always prioritize using a tripod and a slow shutter speed over raising your ISO setting.
When to Raise ISO in Landscape Photography
Despite the general rule of keeping ISO low, there are real situations where raising it is the right call. The goal isn't to avoid high ISO at all costs — it's to use it intentionally when the alternative would produce a worse result.
Handheld Shooting in Fading Light
If you're hiking without a tripod and the light is dropping, you'll reach a point where the shutter speed required for a correct exposure at ISO 100 is too slow to handhold. Camera movement becomes a problem below about 1/60 second for most lenses.
When photographing handheld with a telephoto lens, you'll need an even quicker shutter speed to avoid motion blur from camera shake. A 200mm lens typically requires at least 1/400 second for a sharp handheld shot.
In this situation, raising ISO to 400, 800, or even 1600 gives you a fast enough shutter speed to get a sharp image. A slightly noisy photo is always better than a blurry, unusable one. I've captured landscape shots I'm proud of at ISO 1600 simply because I was in the right place without my tripod and the light was too good to ignore. For more on how shutter speed affects motion and sharpness in your landscape images, see my guide to shutter speed in landscape photography.
Modern cameras handle ISO 800 remarkably well — the noise is manageable and often barely visible in the final image. Most photographers find that current sensors produce clean results up to ISO 800 or higher.
Wildlife and Moving Subjects
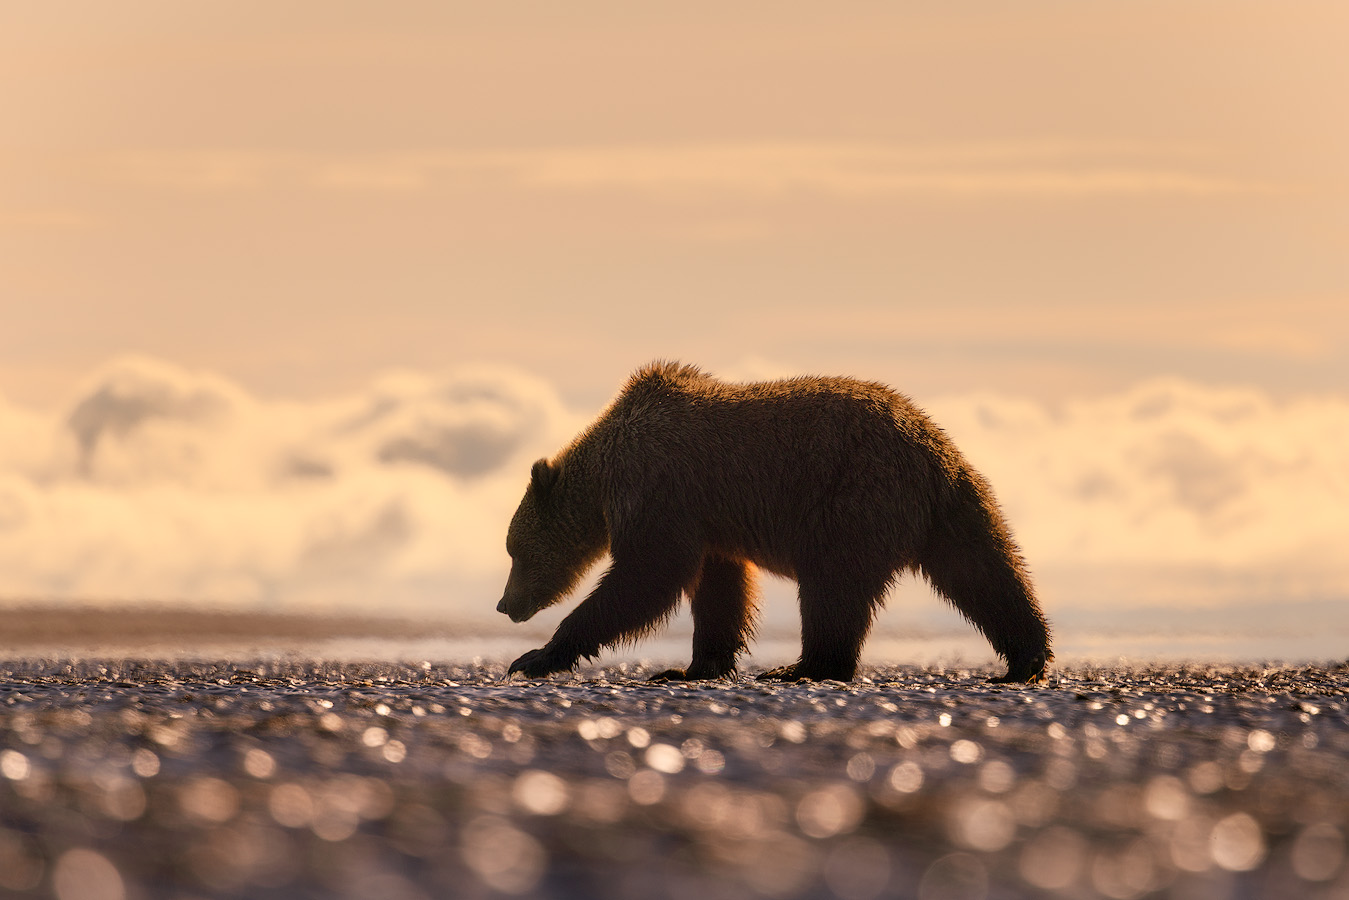
When photographing wildlife in a landscape — bears on a shoreline, birds against a mountain backdrop, caribou crossing tundra — you need fast shutter speeds (1/500s minimum) to freeze the animal's motion and avoid motion blur.
If the available light isn't bright enough to achieve that speed at ISO 100 with your desired aperture, you need to adjust ISO upward. It's the correct solution. The same applies to any scene with camera movement from wind or waves — sometimes a faster shutter speed matters more than the cleanest possible file.
Wildlife doesn't wait for you to set up a tripod. Speed matters. Accept the noise tradeoff and capture the moment.
A well-exposed image at ISO 1600 with a sharp subject will always be more compelling than a blurred attempt at ISO 100. In these situations, a noisy photo you can clean up later beats a missed opportunity every time.
Aurora and Night Sky Photography
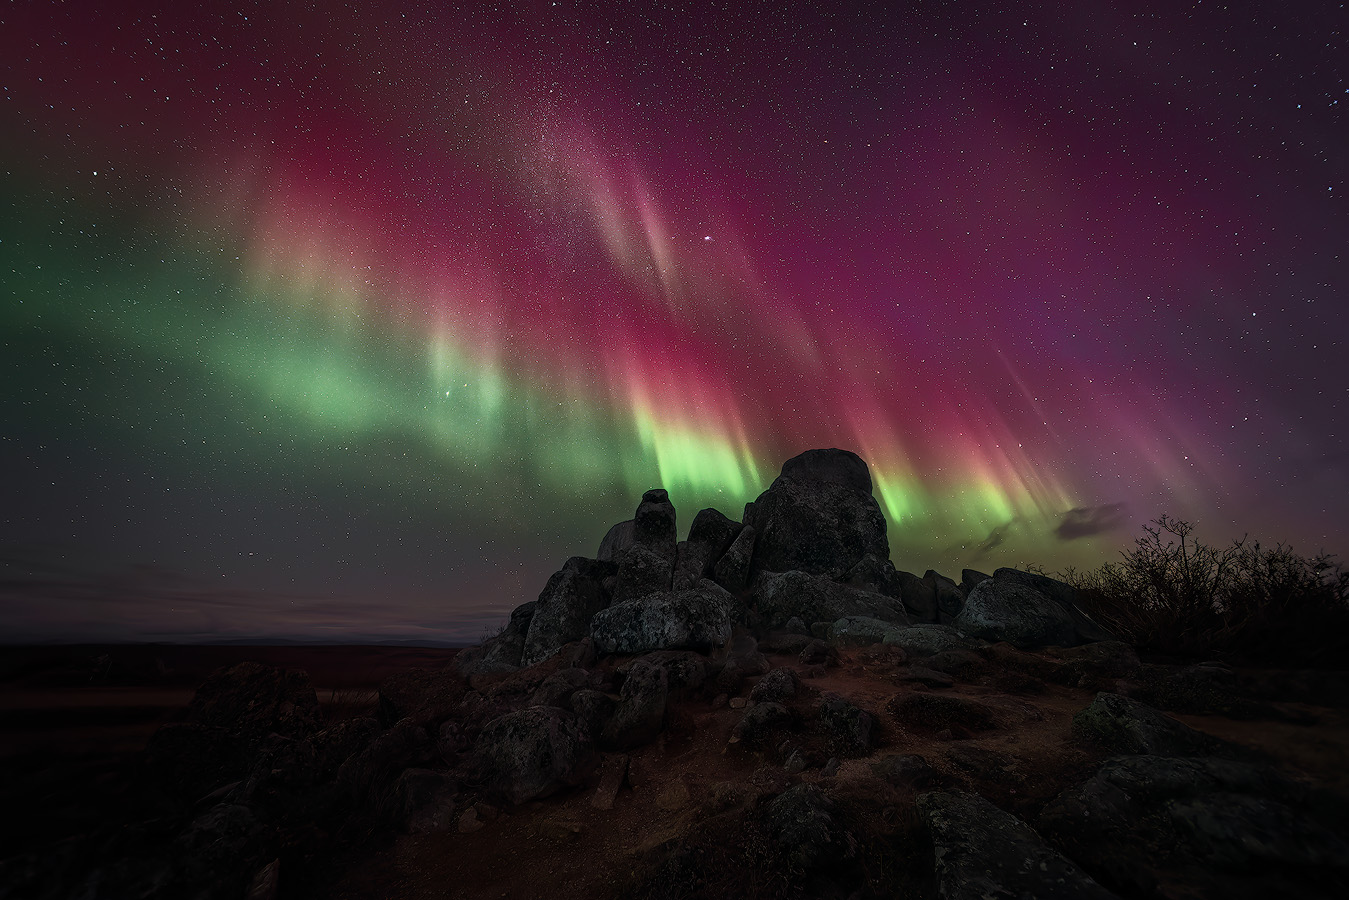
This is where high ISO becomes essential rather than optional. Photographing the northern lights, the Milky Way, or star trails requires ISO settings of 1600 to 6400 or higher. The light is simply too faint for the sensor to capture at low ISO, even with long shutter speeds.
For aurora photography, I typically shoot at ISO 1600 to 3200 with a wide aperture of f/2.8 and a shutter speed of 5 to 15 seconds depending on how fast the aurora is moving. My complete guide covers how to photograph the northern lights including camera settings, composition, and forecasting.
For static stars and Milky Way compositions, ISO 3200 to 6400 with 15 to 25 second exposures is standard. Using a star tracker can help stabilize the camera for longer exposures without star trails, improving image quality in astrophotography.
The noise is real — but it's the only way to capture the night sky. Modern software handles the cleanup remarkably well.
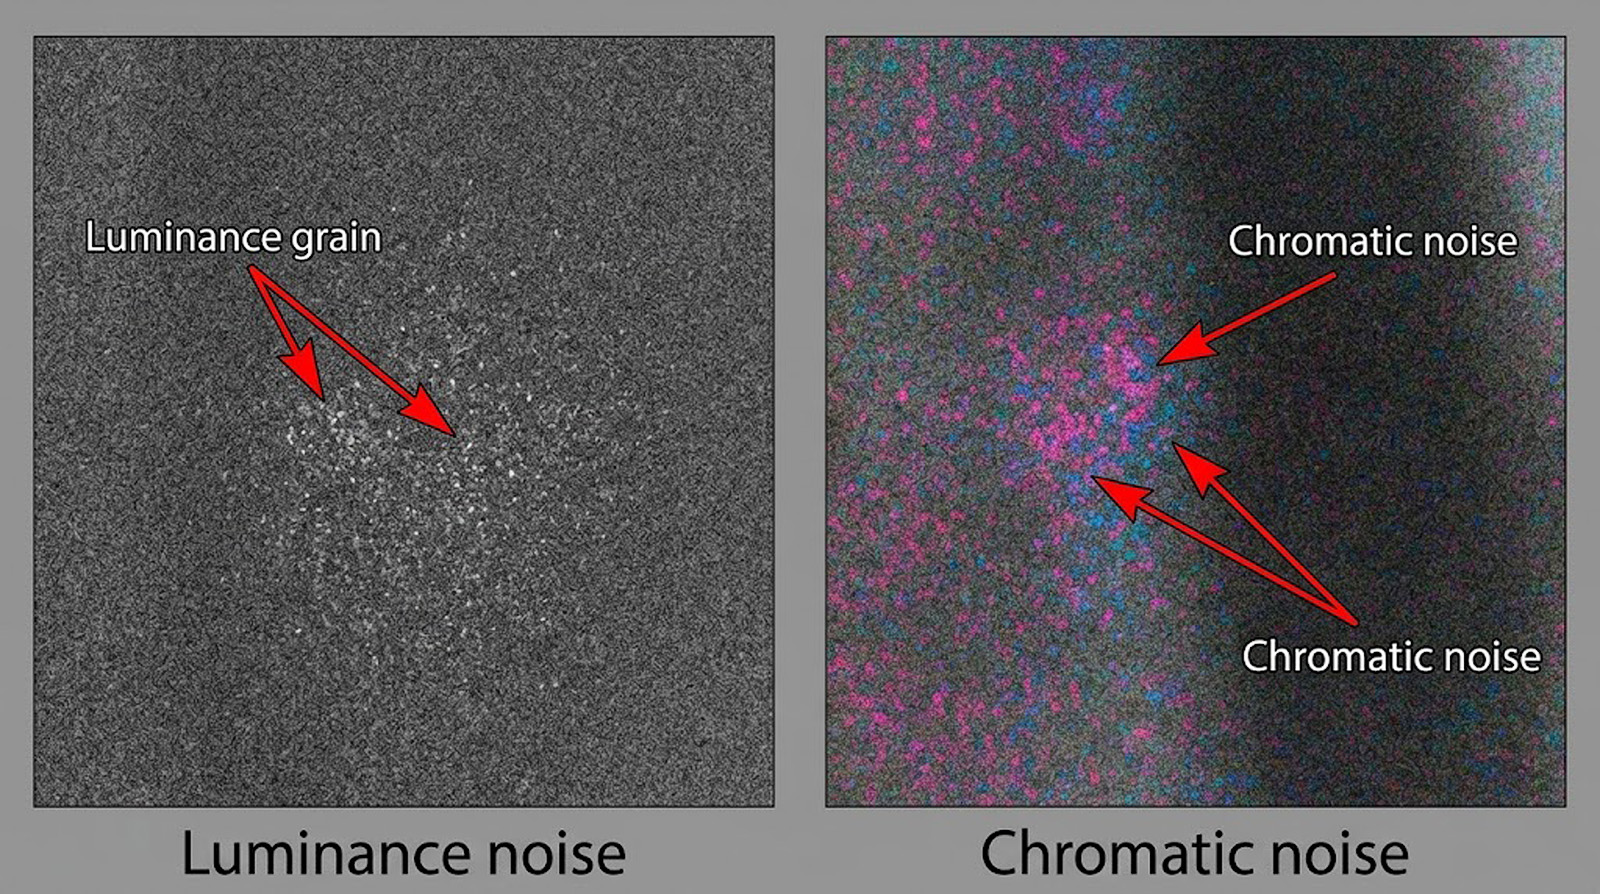
Understanding Noise: Luminance vs. Chromatic
Not all noise is the same. Understanding the difference helps you manage it more effectively in both capture and editing.
Luminance Noise
Luminance noise looks like fine grain across the image — similar to film grain. It affects brightness variations and is most visible in smooth areas like sky gradients or calm water.
At moderate ISO levels (400–1600), luminance noise is often subtle and can even add a pleasing texture to an image. At very high ISO levels, it becomes coarse and distracting.
Chromatic Noise
Chromatic noise appears as colored speckles — random red, green, and blue dots scattered through the image, most noticeably in shadow areas.
This type of noise is almost always unwanted and is harder to remove cleanly than luminance noise. It tends to appear at higher ISO values and in underexposed areas of the frame.
Both types increase as ISO rises. Luminance noise is generally more tolerable. Chromatic noise should be addressed in editing — most RAW processing software, including Adobe Lightroom, handles chromatic removal effectively with minimal loss of detail.
How to Manage ISO in the Field
Knowing the theory is one thing. Making fast, confident decisions while standing in the field with changing light is another.
Most photographers shoot in either aperture priority mode or manual mode for landscape work — both give you direct control over ISO. Using manual mode is recommended for full control over all three camera settings, allowing you to fine-tune exposure for each unique scene. Here's the workflow I use.
The Landscape Photography ISO Workflow
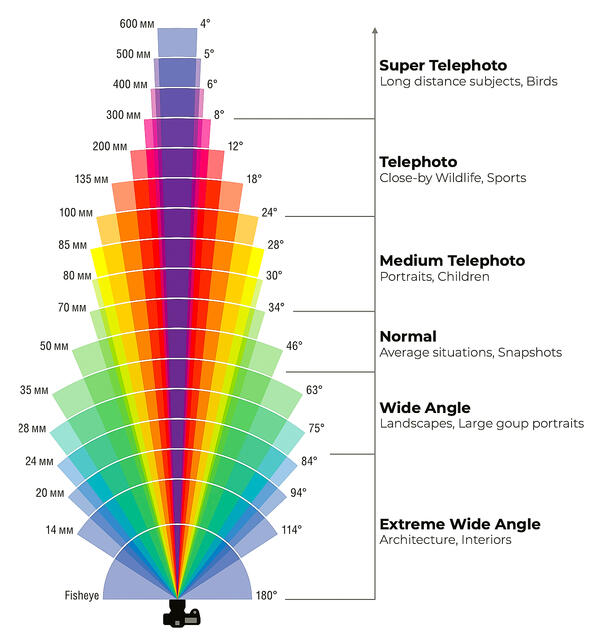
Set aperture first — usually f/8 to f/11 for maximum depth of field and the sharpest results from your lens. My guide to aperture and depth of field covers how to choose the right f-stop for your composition and why f/8 to f/11 delivers the sharpest results.
Wide angle lenses are often used in landscape photography to capture expansive scenes with greater depth of field, while a telephoto lens may require different ISO considerations due to the faster shutter speeds needed to prevent camera movement and blur.
Set ISO to 100. Let the shutter speed fall wherever it needs to for a correct exposure. If you're on a tripod, the shutter speed doesn't matter — it can be 1 second or 30 seconds. Let the camera take its time and collect the available light.
If you're photographing handheld, check the resulting shutter speed. If it's below 1/60 second (or below 1/(2x your focal length) for longer lenses), raise ISO until the shutter speed is fast enough for a sharp shot.
Raise it in small steps — ISO 200, 400, 800 — only as much as needed. This methodical approach ensures you introduce the least amount of digital noise necessary.
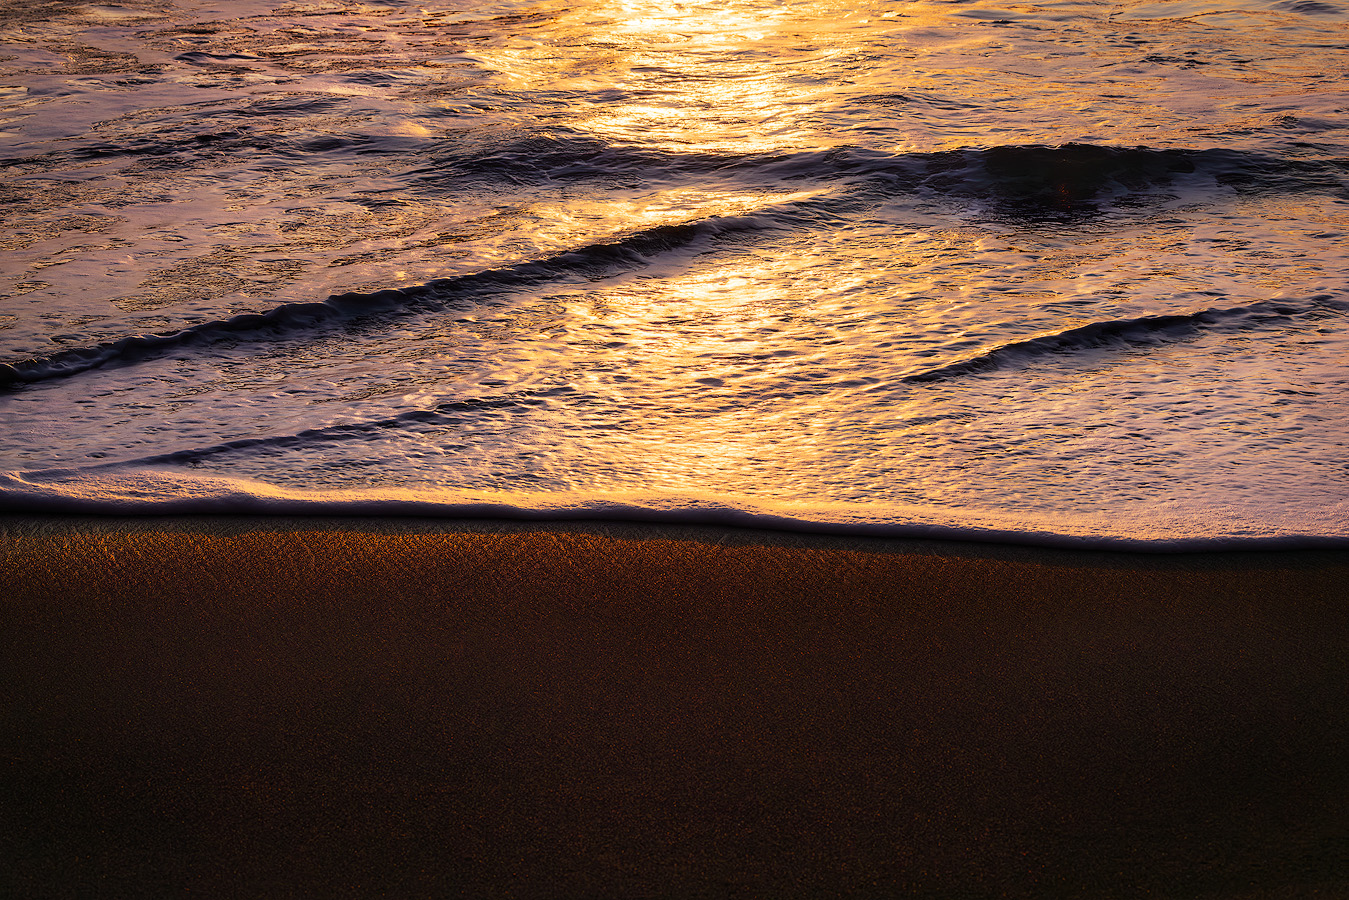
Expose to the Right (ETTR)
Noise is most visible in the dark parts of an image. By making your photo as bright as possible in camera — without blowing out the highlights — you push the shadow areas further from the noise floor.
This technique, called exposing to the right because the histogram shifts toward the right side, gives you cleaner shadow detail. You can darken it in editing with less visible noise than if you had underexposed and tried to brighten later.
ETTR is especially valuable at higher ISO values where noise is already elevated. Check your histogram after every shot. Push the exposure as far right as you can without clipping highlights.
This single habit will make you a better photographer — your files will be cleaner and more flexible in editing.
Know Your Camera's Limits
Every camera handles high ISO differently. Full-frame sensors generally produce less noise than crop sensors because the individual pixels are larger and collect more light. But even within the same sensor size, different digital cameras vary in their performance.
Some modern cameras are described as ISO invariant — meaning their sensors maintain image quality and editing flexibility even when exposure adjustments are made in editing rather than in-camera. This can be especially useful for landscape photographers wanting more flexibility in recovering shadows or highlights.
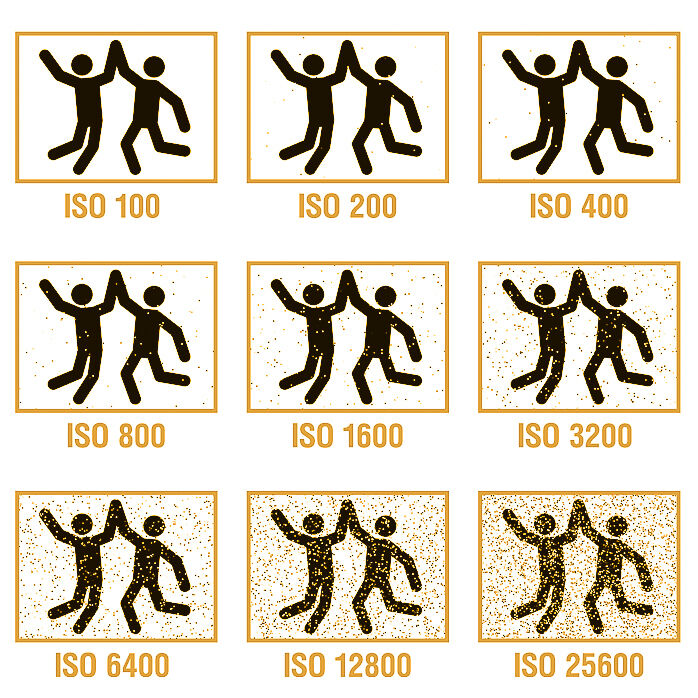
Test yours. Take the same photo at ISO 100, 400, 800, 1600, 3200, and 6400. View them at 100% on a calibrated monitor.
Find the ISO threshold where noise becomes unacceptable to you — that's your personal ceiling. For most cameras made in the last five years, that threshold is surprisingly high — often ISO 3200 or beyond before noise becomes a serious problem in a well-exposed file.
ISO and Dynamic Range: The Hidden Cost
Raising ISO doesn't just add noise — it reduces your dynamic range. Dynamic range is the camera's ability to capture detail across the full spectrum from the darkest shadows to the brightest highlights.
At ISO 100, most modern cameras can capture 12 to 14 stops of dynamic range. At ISO 3200, that drops to 9 or 10 stops — significantly less dynamic range for recovering detail. This means the camera captures less of the tonal information in the scene, giving you fewer options when you try to recover highlights or lift shadows later.
For landscape photography, where scenes frequently contain extreme brightness differences — a sunrise sky above a shadowed valley, sunlit peaks against dark forest — losing dynamic range means less light and shadow detail available in editing.
Blown highlights and crushed shadows are harder to fix when the file started with less tonal latitude. This is particularly noticeable in high-contrast scenes where you need to pull detail from both ends of the histogram.
This is another reason to keep ISO low whenever possible. It's not just about noise — it's about preserving the full richness of the scene in your RAW file.
When a single exposure cannot capture the full dynamic range of a scene, techniques like exposure bracketing — capturing multiple images at different exposures and blending them — can help retain detail across the entire tonal spectrum.
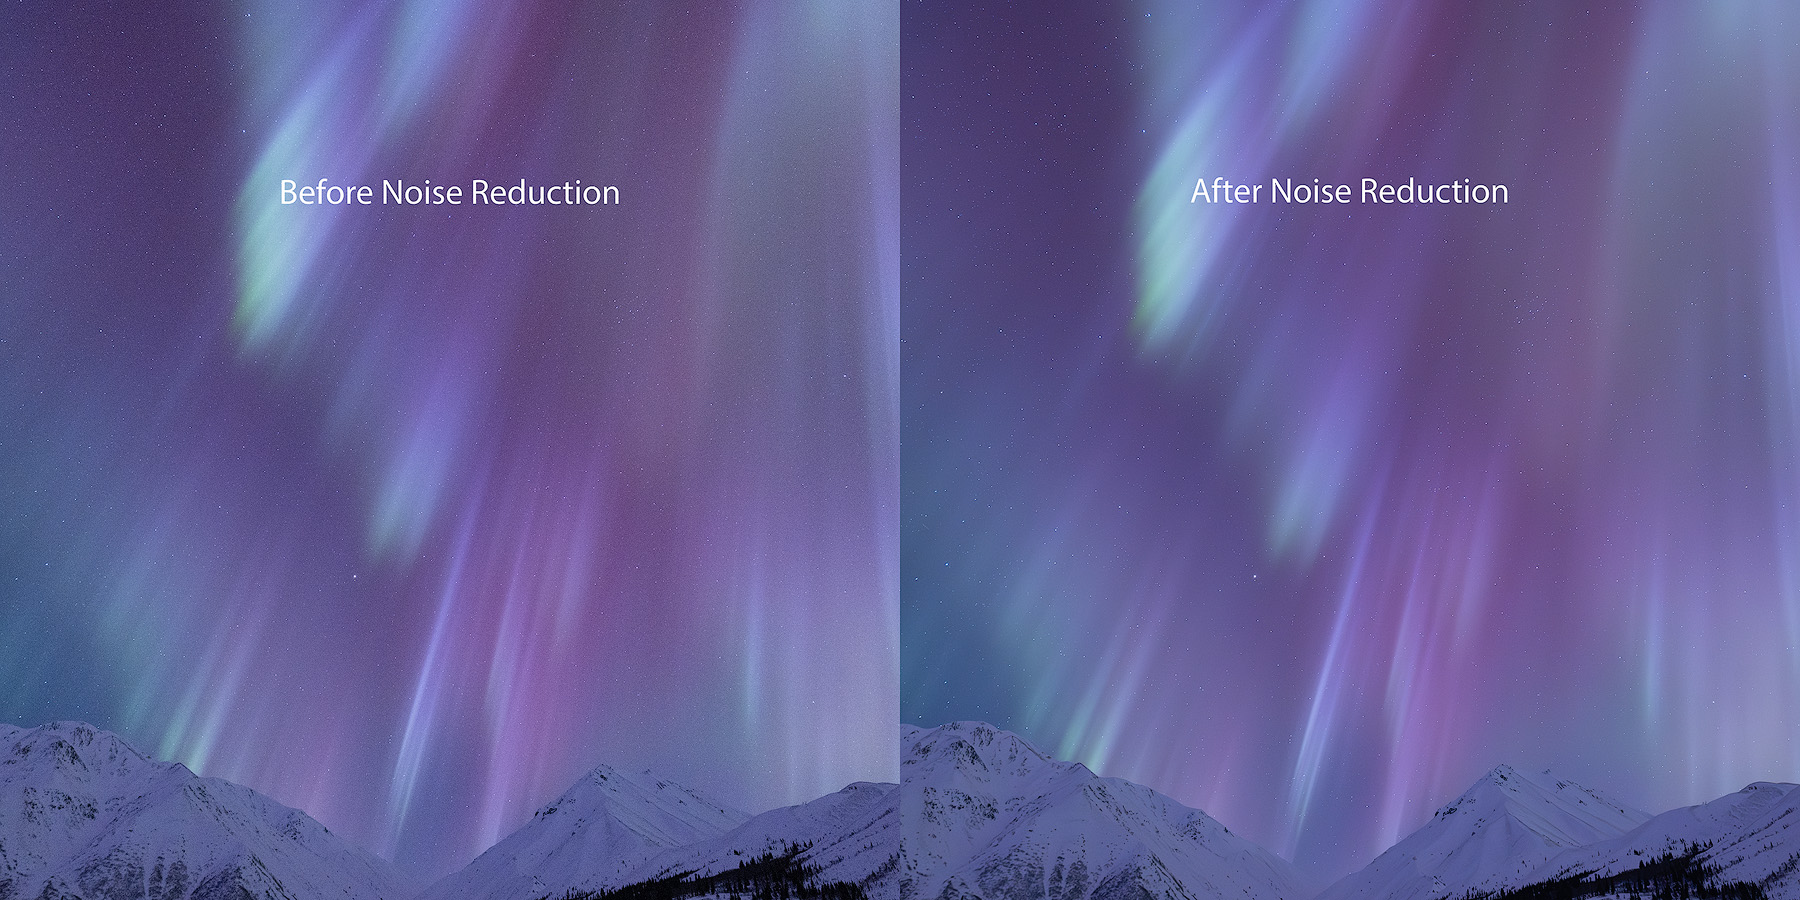
Dealing with Noise in Editing
Even with careful ISO management, noise will appear in some images — especially those shot at higher sensitivity for aurora, night sky, or handheld low-light work. The goal is always less noise in the final image while preserving the detail that makes landscape photos compelling.
Software Options
Adobe Lightroom includes built-in sliders for both luminance and chromatic noise. For most landscape images shot at moderate ISO values, Lightroom's tools are sufficient to achieve a clean, sharp final image.
For high-ISO files — aurora shots at ISO 3200+, night sky images — dedicated tools like DxO PureRAW or Topaz DeNoise AI produce significantly better results. These use machine learning to separate noise from detail, preserving sharpness while removing grain in ways that traditional sliders can't match.
For a deeper look at how noise works at the sensor level and how to manage it throughout your workflow, see my guide to signal to noise ratio in photography.
When to Clean Up Noise
Apply noise tools after your global adjustments (exposure, white balance, contrast) but before local adjustments and sharpening.
Over-applying can smudge fine detail and give the image a waxy, unnatural look. The goal is to reduce noise to an acceptable level while preserving the texture and detail that make landscape photographs compelling.
It's a balancing act — tame the noise without sacrificing the essence of the scene.
Common ISO Mistakes in Landscape Photography
Leaving ISO on Auto. Auto ISO is useful for street photography or events, but in landscape photography it often raises ISO unnecessarily — especially when you're on a tripod and a slow shutter speed would work fine. Using the wrong ISO setting can negatively impact image quality, so take manual control.
Raising ISO instead of using a tripod. If you're shooting a static landscape, there's rarely a reason to go above ISO 100. Put the camera on a tripod, use a slow shutter speed, and keep the file clean.
The only exception is if wind or subject movement makes a fast shutter speed necessary.
Underexposing and brightening later. Pushing shadows amplifies noise dramatically. It's always better to expose correctly — or slightly to the right — in camera. A well-exposed ISO 800 file will often look cleaner than an underexposed image at ISO 100 brightened by two stops.
Fear of high ISO. Modern cameras are far more capable at high ISO than cameras from even five years ago. Don't miss a once-in-a-lifetime aurora display or a bear walking through golden light because you're afraid of noise. Capture the moment. Handle the noise later. Mastering this balance makes you a better photographer.
What Happens When You Master ISO
Once you understand ISO — not just the number, but the tradeoffs it represents — you stop thinking about it as a setting and start thinking about it as a creative decision.
You know when ISO 100 is non-negotiable and when ISO 3200 is the right tool. You stop guessing and start making intentional choices that serve the image. You can walk into any lighting situation — golden hour, deep shade, blue hour, full darkness — and know exactly how to set your camera without hesitation.
Combined with aperture and shutter speed, ISO completes the exposure triangle. Mastering all three gives you full creative control over how light, motion, and depth appear in your landscape photographs — and that control is what leads to sharper, more impactful images that capture the landscape the way you experienced it.
Here's what most photographers don't realize: noise is rarely an ISO problem. It's a settings problem. When you expose correctly in camera — pushing the histogram right, avoiding aggressive shadow recovery in editing, picking the right aperture for the available light — ISO 1600 looks remarkably like ISO 400. The files that look ruined by noise almost always trace back to underexposure being pushed in post, not to the ISO number on the dial.
If you want to practice making these decisions in the field — reading light, choosing camera settings, and understanding why each choice matters — that's exactly what my photography workshops are built around.
FAQ — ISO in Landscape Photography
What ISO should I use for landscape photography?
ISO 100 is your default for landscape photography. Use it whenever you're on a tripod shooting a static scene.
Only raise ISO when you need a faster shutter speed for handheld shooting, wildlife, or night photography. The lower the ISO, the cleaner and more detailed your file will be.
Does ISO affect image sharpness?
Not directly, but it affects image quality in ways that reduce perceived sharpness. Higher ISO introduces noise that obscures fine detail, and any cleanup applied to fix it can soften the image further.
For the sharpest landscape photos, keep ISO at its base setting and use a tripod.
What ISO should I use for northern lights photography?
For aurora photography, ISO 1600 to 3200 is typical. Pair it with a wide aperture (f/2.8 or wider) and a shutter speed of 5 to 15 seconds depending on aurora speed.
For static star fields and Milky Way shots, ISO 3200 to 6400 with 15 to 25 second exposures is standard. A long shutter speed is often necessary to gather enough light for stars and auroras.
Is Auto ISO good for landscape photography?
Generally no. Auto ISO removes your control over one of the three exposure settings and often raises ISO unnecessarily when a slower shutter speed on a tripod would produce a cleaner file.
Use manual ISO control for photographing landscapes and only consider Auto ISO for fast-moving situations like wildlife.
How do I reduce noise in landscape photos?
Start by keeping ISO low and exposing correctly in camera — this is the most effective strategy. In editing, Adobe Lightroom's sliders handle moderate noise well.
For high-ISO files, dedicated software like DxO PureRAW or Topaz DeNoise AI produces superior results by intelligently separating noise from detail.
What's the difference between luminance and chromatic noise?
Luminance noise appears as fine grain affecting brightness — similar to film grain. Chromatic noise appears as random colored speckles, most visible in shadow areas.
Both increase with higher ISO. Chromatic noise is easier to remove cleanly in software. Luminance noise at moderate levels can actually add a pleasing texture to landscape photographs.